The making of: Franky's Notes Azure Search - part 2

This post concludes The making of: Franky’s Notes Azure Search. In the previous post, I build a console application in .Net using the RedDog.Search library, to populate an index in my Azure Search Service with my notes.
In this post, I’m sharing with you how I created the user interface to query my notes. To know more about the Azure Search REST API, all the documentation is available online.

Objectives


For this part of the project, we will use the azure-search javascript client of Richard Astbury available on Github. The idea is to build a nice user interface (UI) that will provide a simple and efficient way to search. Since the code will be in JavaScript, it’s strongly suggested to use a query key instead of a master key. These keys can be managed from the Azure Portal.

Azure Search Query Keys

Creating the Interface


First, we need to get the azure-search. To get it, you can whether download the file azure-search.min.js on Github or by execute npm install azure-search from a Node.js console.
Now we need a simple HTML page with a form, a textbox and a button.
    <html>
        <head>
            <title>Search</title>
            <link  href="css/bootstrap.min.css" rel="stylesheet">
            <!--[if lt IE 9]>
                <script src="scripts/html5shiv.min.js"></script>
                <script src="scripts/respond.min.js"></script>
            <![endif]-->
        </head>
        <body>
            <form>
                <label>Search</label>
                <input id="txtSearch" placeholder="Search">
                <button id="btnSearch" type="button">Search</button>
            </form>

            <div id="result"></div>

            <script src="scripts/jquery.min.js"></script>
            <script src="scripts/bootstrap.min.js"></script>
            <script src="scripts/azure-search.min.js"></script>
            <script>

                var client = AzureSearch({
                  url: "https://frankysnotes.search.windows.net",
                  key:"DB7B9D1C53EC08932D8A8D5A1406D8CA" // - query only
                });

            </script>
        </body>
    </html> 
As you can see I’m creating the AzureSearch client using my query key from before. Afterwards, we create a Search function to retrieve the search criteria from the textbox and pass it to the client. A dynamic function is used as a callback that receives the parameter noteList which is an array of matching documents. We finally just need to loop through the result to build a nice output.
    function Search(){

        var _searchCriteria = $("#txtSearch").val();   
        var _objSearch = {search: _searchCriteria, $orderby:'title desc'};

        client.search('notes', _objSearch, function(err, noteList){
            var $divResult = $("div#result");
            $divResult.html( "<div class='panel-heading'><h3 class='panel-title'>" + noteList.length + " Result(s)</h3></div><div class='panel-body'>" );

            if(noteList.length > 0){

                var _strResult = "";
                _strResult = "<ul class='list-group'>";

                for(var key in noteList){
                    var fNote = noteList[key];

                    _strResult += = "<li class='list-group-item'><a href='" + fNote.url + "' target='_blank'>" + fNote.title + "</a><p>" + fNote.note + "</p></li>";
                }

                _strResult += "</ul></div>";
                $divResult.append( _strResult );
            }
      });
    }

If we put all this together, we got a nice result.

Franky's Notes Search UI

Live Demo

Conclusion


I really had a lot of fun creating these little applications. I found the client incredibly easy to use. I hope it will help you to get ideas and moving forward to use Azure Search. Any comments, suggestions and/or questions are welcome.


~ Frank Boucher


References


Reading Notes #160

multipleCloudStorageSuggestion of the week


Cloud


Programming

  • Don't Frown on CSVs - Nice post that explains why we shouldn't over look the good old CSV format.

Miscellaneous


~Frank Boucher


The making of: Franky's Notes Azure Search - part 1


For a long time now, I'm thinking about creating an API that will allow to search easily through my notes. When Azure Search came public few weeks ago, I knew it was what this project needed to come alive. In this post, I will share how I did it, and more importantly, show how incredibly easy it was to do.


What's Azure Search?


Currently in preview, Azure Search is a cloud-based search-as-a-service that provides a set of REST APIs defined in terms of HTTP requests and responses, in OData JSON format.

Getting Started


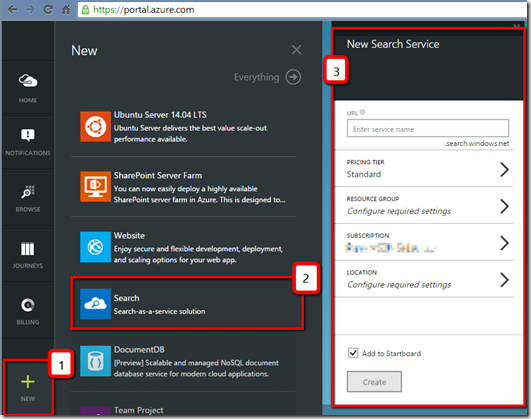
From the Azure Portal, let's create an Azure Search Service by clicking the plus button on the bottom left of the screen. Select the Search option, and fill-up the options.

Azure_portal_crete_Search_Service_2014-10-20_0931

Application to populate my Azure Search service


First, we will need some data. My weekly posts Reading Notes are generated with a Ruby script that I did few years ago. You can read more about it on First step with Ruby: Kindle Clipping Extractor. Basically, the script extracts my notes from my Kindle and build a collection of notes grouped in different categories to generate a markdown file. That can easily be done by adding a new Json output file. Here is a quick view this output.
{
  "json_class": "FrankyNotes",
  "categories": {
    "dev": [
      {
        "id": 77077357,
        "title": "Customize the MVC 5 Application Users’ using ASP.Net Identity 2.0",
        "author": "Dhananjay kumar",
        "url": "http://debugmode.net/2014/10/01/customize-the-mvc-5-application-users-using-asp-net-identity-2-0/",
        "note": "Need to get the fukk article",
        "tags": "dev,frankysnotes,readingnotes160",
        "date": "2014/10/17",
        "category": "dev"
      },
      {
        "id": 77156372,
        "title": "Custom Login Scopes, Single Sign-On, new ASP.NET Web API – updates to 
      [...]

Now that we have some data, we need to create an index and be able to add document in it. A console application will be perfect for this job. At the time of writing this post, two libraries exist to interact with the Microsoft Azure Search REST API. For this part of the project, we will use the RedDog.Search library available on Github, since it's a .Net library.

Note: To create an index or upload documents you will need an admin key.

Admin_Key

First, we need to create an Index. Let's keep it simple and just create the index with all the properties of the json object. Here the code of my function CreateNoteIndex.
public IndexManagementClient Client
{
    get
    {
        if (_client == null){
            _client = new IndexManagementClient(ApiConnection.Create("frankysnotes", "AdminKey"));
        }
        return _client;
    }
}

public async Task<string> CreateNoteIndex()
{
    var createResult = await Client.CreateIndexAsync(new Index("notes")
        .WithStringField("id", opt => opt.IsKey().IsRetrievable())
        .WithStringField("title", opt => opt.IsRetrievable().IsSearchable())
        .WithStringField("author", opt => opt.IsRetrievable().IsSearchable())
        .WithStringField("url", opt => opt.IsRetrievable().IsSearchable(false))
        .WithStringField("note", opt => opt.IsRetrievable().IsSearchable())
        .WithStringField("tags", opt => opt.IsRetrievable().IsFilterable().IsSearchable())
        .WithStringField("date", opt => opt.IsRetrievable().IsSearchable())
        .WithStringField("category", opt => opt.IsRetrievable().IsFilterable().IsSearchable())
        );
    if (createResult.IsSuccess)
    {
        return "Index Reseted successfully";
    }
}

To be able to search by note instead of by post, I decided to break down the file in multiple documents containing one note by document. After what, it was really easy to upload the documents into the index.
public async Task<string> AddNotes(string filepath)
{
    var docs = new List<IndexOperation>();
    FrankysNotes notes = DeserializeFNotes(filepath);

    foreach (var category in notes.categories)
    {
        foreach (var fNote in notes.categories[category])
        {
            var doc = ConvertfNote(fNote);
            docs.Add(doc);
        }
    }

    var result = await Client.PopulateAsync("notes", docs.ToArray<IndexOperation>());

    return "File uploaded successfully";
}


private FrankysNotes DeserializeFNotes(string filepath)
{
    var jsonStr = File.ReadAllText(filepath);
    var serializer = new JavaScriptSerializer();

    var notes = serializer.Deserialize<FrankysNotes>(jsonStr);
    return notes;
}

private IndexOperation ConvertfNote(FrankysNote fnote)
{
    var doc = new IndexOperation(IndexOperationType.Upload, "id", fnote.id)
                    .WithProperty("title", fnote.title)
                    .WithProperty("author", fnote.author)
                    .WithProperty("url", fnote.url)
                    .WithProperty("note", fnote.note)
                    .WithProperty("tags", fnote.tags)
                    .WithProperty("date", fnote.date)
                    .WithProperty("category", fnote.category);
    return doc;
}

To keep the code as clear as possible, I removed all validations and error management. The json file is deserialized, then looping through all notes I build a list of IndexOperation. And Finally I upload all the notes with Client.PopulateAsync("notes", docs.ToArray<IndexOperation>());

Wrapping up


Using the RedDog.Search library to push documents in Azure Search Index was extremely easy. In fact, it's that simplicity that pushed me to share my discovery. In the next part of the series, I will create a simple HTML page to do real query.

Stay tune...

~ Frank Boucher

References

Reading Notes #159

AzureConf2014Suggestion of the week


Cloud


Programming


Database


Miscellaneous

~Frank Boucher

Reading Notes #158

ButtonsamplepngSuggestion of the week


Cloud

  • Designing for Big Scale in Azure (K. Dotchkoff) - Nice post that explains how we should change our design in the cloud and use logical container or scale units.

Programming

  • Building a Better NuGet (Edward Charbeneau) - Nice post that gives us the best practices when developing a NuGet package.

Miscellaneous


~Frank


Why I switch to Markdown

The Markdown is not a new video game, but a way to write in plain text that can easily be converted in HTML. This "new" standard is gaining in popularity for many reasons. In this post, I will explain why I like it and show you some basic syntax, and nice tools.

What is Markdown

The exact Markdown's definition can by found on the Markdown website and look like this:
Markdown is a text-to-HTML conversion tool for web writers. Markdown allows you to write using an easy-to-read, easy-to-write plain text format, then convert it to structurally valid HTML.
The syntax in Markdown is very easy to learn. In fact, it will come mostly by itself since it will look nice in any text editor.  For example, title and subtitle and list look like:

Title and sub-title
This Is My Title
================

Subtitle 1
----------

Here some items:
- Item 1
- item 2
- item 3

That easy right?! Let's add two more sample, this time a bit more "complex": Links and images.

Link

For links, two styles are possible:

Inline:

[Link Text](http://www.frankysnotes.com)
Reference:

[Link Text][1]
[Another one][link2]

...

[1]: http://www.frankysnotes.com 
[link2]: http://www.frankysnotes.com    

I personally prefer the reference style, because it keeps the text clean and easy to read. To add an image it's mostly the same two style again, but we add an exclamation point in front of the square brackets.

Image
![alternative text](http://frankysnotes.com/images/logo.png)

![alternative text][logo]

...

[logo]:http://frankysnotes.com/images/logo.png

This these simple things cover mostly everything we need when writing documentation, blog posts or reference documents. Obviously if you need more you can always go on the Markdown website. I also put online this full article in Markdown format.


Why Markdown is so nice

First, I really like Mardown because I can edit my files on all platforms. Since they are regular text files, any text editor on Android, IOS, Windows Phone, PC and Linux will do the job perfectly. Plus, your text will never lose is formatting, while changing from a device to another one (like with Word documents).
Likewise, since I'm working on different devices, I usually put my file in a shareable place like Dropbox or OneDrive. A simple text file is very small and quick to synchronize.

Tools, apps and more

Yes, you can edit your file in any text editor, but here are some nice tools that are available that will improve your experience.

MarkdownPad

MarkdownPad is a full-featured Markdown editor for Windows. It`s available in a free and pro version. Some interesting features are:
  • Instant HTML Preview
  • Easy Markdown formatting with keyboard shortcuts
  • Spell check
  • Use your own CSS
  • HTML and PDF Export
Website: http://markdownpad.com/


Denote
Denote is a Markdown text editor for Android that provides effortless syncing with Dropbox. Files created with Denote are saved as text (.txt) files.
  • Live preview for Markdown and HTML
  • Cloud based: Denote stores all its data in a subfolder on your personal Dropbox account so you can access it via your Mobile devices, Mac or PC
  • Offline support: changes are synced with Dropbox next time you're connected
  • Email files created in Denote
  • Customize font size and type face used for notes
Website: http://www.2storks.com/denote


Atom
This great text editor from GitHub has a nice Markdown Preview package, that will convert the markdow in HTML.
Atom Website: https://atom.io/
Markdown Preview package: https://github.com/atom/markdown-preview


Sublime Text
Sublime text is a well knowed text editor in the developer community and many different packages are also available.
Sublime Text Website: https://atom.io/
Markdown Preview package: https://github.com/revolunet/sublimetext-markdown-preview

In conclusion

I hope this post will motivate you to give it a try. Thanks for reading. Any comments, suggestions and/or questions are welcome.


~Frank Boucher


Reading Notes #157

microsoftazurewebsitescheatsheetSuggestion of the week


Cloud


Programming

  • Inception-Style Nested Data Formats (Scott Hanselman) - What seem to be a good solution at one point could put you in a big problem tomorrow. This post explains one possible cause.

Database


Miscellaneous

  • Markdown Style Guide - This post gives some simple tips to keep our Markdown document easy to read when not converted.

~Frank


Let's play with Azure SQL Database backup and the Point in Time Restore

Did you know that you can have: a full database backup once a week, a differential database backups once a day, and a transaction log backups every 5 minutes of your Azure SQL Database? Did you know that all this is done automatically when you are using the new Azure SQL Basic, Standard or Premier service tiers? Even more, you will have access to the Point in Time Restore self-service. In this post, I will show how to "configure" the database to get the automatic backups, and how to do a restore.

Setup the automatic backup


If you are like me, your Azure SQL Databases are set to Web or Business edition.  The first thing to do will be to change that. You will need to do it anyway since the Web and Business service tiers will be retired in September 2015[1].  That the only required since backup service are built-in the Basic, Standard and Premium tiers.
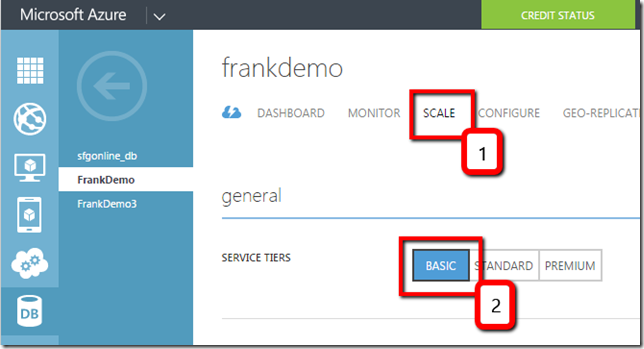
For the demo purpose, I will use the Basic tier. To change the tier of the database, go on the Azure Portal. In the left panel click on the SQL Databases et select the database that you want to update (ie: FrankDemo). Once the right section is updated, select the Scale tab and change the Service Tiers for: Basic.

Tiers_Basic

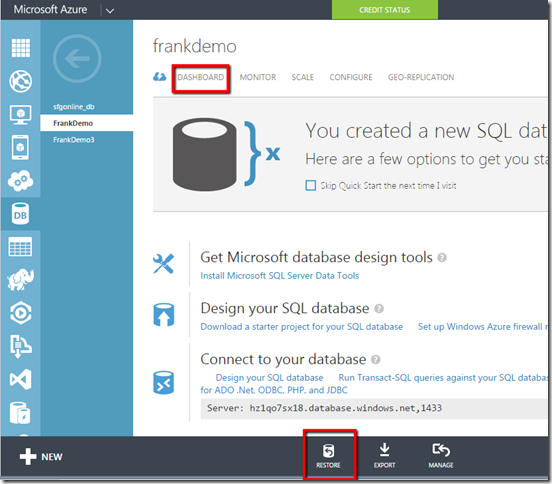
Now, if you return in the Dashboard tab, a new option will be available.

Restore_button

Your database now has built-in backups to support self-service Point in Time Restore and Geo-Restore. Azure SQL Database automatically creates backups using the following schedule:
  • Full database backup once a week
  • differential database backups once a day
  • transaction log backups every 5 minutes.
The full and differential backups are replicated across regions.

The retention period will vary between 7 and 35 days base on the selected tiers.[2]

Restore an Azure SQL Database


Restoring a database is really easy. Remember that new button at the bottom of the screen, it's now time to click on it.


Restore_setings

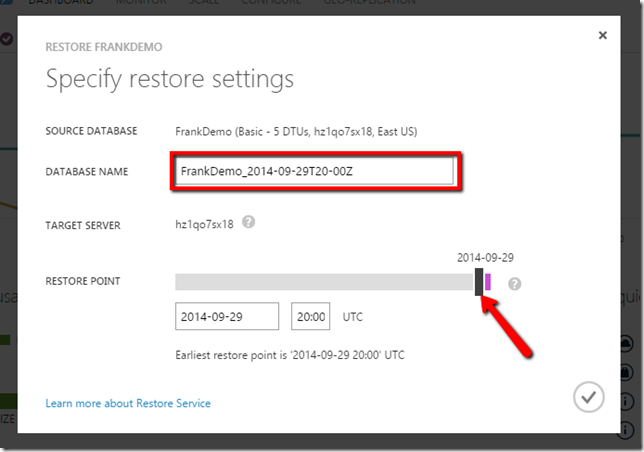
This will bring the settings options. It's now time to type the name of your restored database. Note that you must use a different name than the original.  It's always a good practice to double-check that you are pointing on the good database on the correct server. Pick a restore point using the slider or by filling the date and time fields. When you are done click the button. The portal will let you know that the restore is successfully completed by a notification.


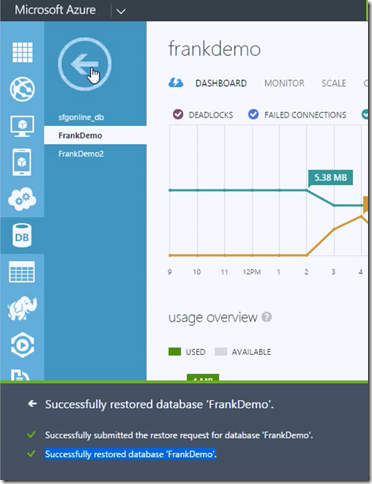
Restore_done

I hope that this post shows you how easy it is to use the backup/restore with Azure SQL Database. Thank you for ready, Any comments, suggestions and/or questions are welcome.


[1]: Web and Business service tiers will be retired in September 2015, more
details on the Windows Azure site.
[2]: Detail about the retention period on Azure SQL Database Backup and Restore


~ Frank Boucher