Recently I participated in a series of videos about Azure Static Web Apps: Azure Tips and Tricks: Static Web Apps on Microsoft Channel 9. The series is perfect to get started and cover multiple different scenarios in different Javascript frameworks and C#. In this post, I wanted to regroup the four videos related to .Net Blazor. I also added the GitHub links part of the references at to end.
Prevent unwanted users to access your C# API by configuring authentication and authorization in your Blazor Azure Static Web Apps.
I hope those videos will help you to get started. If you have questions and/or comments don't hesitate to reach out (comments, DM, GitHub issues), it's always a pleasure.
In this video, I wanted to show one of the great features of Azure Static Web App Learn: the creation of pre-production environments. Using the CI/CD workflow, you can preview your pull requests changes before it's in production leveraging the automatic creation of pre-production environments!
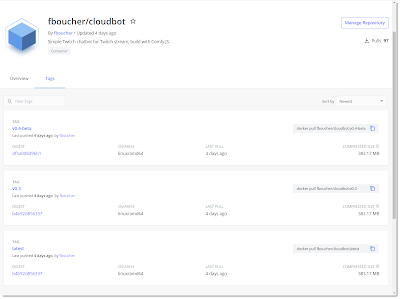
I'm not a Docker master, but I understand that it's very useful and I like to use it from time to time in some projects. Another thing I like is DevOps and automation and in a project I have, I was missing that. In the previous setup, the container was built and publish to DockerHub with the date as a tag. Nice but not very easy to now with versions are "stable" and wish one are "in progress".
This post is about how I build a continuous integration and continuous deployment solution for my docker project. All the code is on GitHub and Docker Hub. I sharing my journey so others can enjoy that automation and not spend a weekend building it.
The Goal
By the end of this build, there will be two GitHub Action to build and publish a different version of the application on Docker Hub.
The release version: every time a release is published on GitHub a container tag with the matching version number will be built and published. (ex: myapp:v1)
The beta version: At every push in my branch on GitHub a container will be published with a specific tag. The tag will be matching the draft release version number with -beta. (ex: myapp:v2-beta).
In this post, the application is a Node.js Twitch chatbot. The type of application is not important the post focus on the delivery.
Publishing the release version
Every time a release is published on GitHub, the workflow will be triggered. It will first retrieve the "release version" then build and tag the container with it and finally publish (aka push) it to Docker hub. Because a "release" is also a "stable" version it will also update the container tag latest.
Let's look at the full YAML definition of the GitHub Action and I will break it down after.
name: Release Docker Image CI

on:
  release:
    types: [published]
jobs:
  update:
    runs-on: ubuntu-latest
    steps:
    - uses: actions/checkout@v2
    - name: Set outputs
      id: vars
      run: echo ::set-output name=RELEASE_VERSION::$(echo ${GITHUB_REF:10})
    - name: Publish to Registry
      uses: elgohr/Publish-Docker-Github-Action@master
      with:
        name: ${{secrets.DOCKER_USER}}/cloudbot
        username: ${{ secrets.DOCKER_USER }}
        password: ${{ secrets.DOCKER_PASSWORD }}
        tags: "latest,${{ steps.vars.outputs.RELEASE_VERSION }}"
To limit how many times the workflow is triggered I used on: release and the type: published, adjust as you like.
The next interesting part is the lines in the step vars.
- name: Set outputs
    id: vars
    run: echo ::set-output name=RELEASE_VERSION::$(echo ${GITHUB_REF:10})
Here I use the environment variable GITHUB_REF (striped of the 10 first characters contains "refs/tags/") to initialize a local variable RELEASE_VERSION. The value is available from the outputs of that step, like on the last line of the YAML.
From the steps identified by the id vars I retrieved from the outputs the value of RELEASE_VERSION.
In this GitHub Action, I used elgohr/Publish-Docker-Github-Action@master because it was simple and was doing what I need. You can execute docker commands directly if you prefer or use the docker/github-actions.
Every time a push is done on GitHub, the workflow will be triggered. It will first retrieve the "release version" of the most recent release in draft mode. The workflow will happen -beta to the retrieved version and use this to tag the container. Finally, publish (aka push) it to Docker hub.
Once more, here full YAML, I will break it down after.
Here the difficulty was that I wanted to create a tag from a "future" version. I decided to use the Draft Releases because those are not visible by everyone, therefore they look like the future.
If your last release is version 1 (v1.0), to make this workflow possible you will need to create a new release and save it in Draft.
Like in the Release workflow, I need to retrieve the version. Because drafts are only visible to some people we will need to get access. This is easily done by using a github.token. Those are created automatically when the GitHub Action starts.
And voila, a very simple and easy to implement ci-cd for a container project. There are many different options, looking forward to learning how you did yours?
Extreme Ownership: How U.S. Navy SEALs Lead and Win (Jocko Willink, Leif Babin) - Very interesting book. Yes, it contains a lot of battle details, and first I was not sure, but then things "fall" all in place when you understand what the story was "demonstrating." It also contains more business focus examples. Everything is very clear, well explained in plain English.
I'm about to start a new project and want to have it with a continuous integration (CI) and continuous deployment (CD). I've been using VSTS for a while now but didn't have the chance to try the new pipelines. If you didn't know VSTS as been rebranded/ redefined as Azure Devops. Before going in with the real thing I decided to give it a try with a simple project. This post is to relay those first steps.
Get Started
Let's start by creating our Azure Devops project. Navigate to Dev.Azure.com and if you don't already have an account create one it's free! Once you are logged-in, create a new project by clicking the New project blue button in the top right corner.
You will need to provide a unique name and a few simple information.
The Application
First thing first, we need an application. For this post, I will be using a simple Asp.Net Core site. For the repository, we have options. AzureDevOps (ADOps) support many repository: GitHub, Bitbucket, private Git and its own. Because the project I've created is public I decided to keep the code at the same place as everything else.
From the left menu, select Repos. From here if the code already exist just add a remote repository, or clone the empty one on your local machine, the usual. Create and add your code to that repository.
The Azure WebApp
The next step is to create a placeholder for our CD pipeline. We will create an empty shell of a web application in Azure with these three Azure CLI commands. You can execute them locally or from the Cloud Shell. (Don't forget to validate that you are in the good subscription)
az group create --name simplegroup --location eastus

az appservice plan create --name simpleplan --resource-group simplegroup --sku FREE

az webapp create --name simplefrankweb --resource-group simplegroup --plan simpleplan
The first command will create a Resource group. Then inside of this group we create a service plan, and finally we create a webapp to the mix.
Continuous Integration
The goal is to have the code to get to compile at every commit. From the left menubar, select Pipelines, and click the create new button. The first step is to identify where our code is, as you can see Azure DevOps is flexible and accept code from outside.
Select the exact repository.
This third step displays the YAML code that defines your pipeline. At this point, the file is not complete, but it's enough to build, we will come back to it later. Click the Add button to add the azure-pipelines.yml file at the root level of your repository.
The build pipeline is ready click the Run button to execute it for the first time. Now at every commit, the build will be triggered. To see the status of your build just on to into the build section from the left menubar.
Continuous Deployment
Great, our code gets to compile at every commit. It would be nice if the code could also be automatically deployed into our dev environment. To achieve that we need to create a Release Pipeline. And our pipeline will need artifacts. We will edit the azure-pipelines.yml to add two new tasks. You can do this directly in the online repository or just from your local machine; remember the file is at the root. Add these commands:
Those two tasks are to publish our application (package it), and make it available in our Artifact folder. To learn more about the type of command available and see example have a look the excellent documentation at: https://docs.microsoft.com/azure/devops/pipelines/languages/dotnet-core. Once you are done, save and commit (and push if it was local).
From the left menubar, click on e the Pipeles, select Release, and clienk the New Release blue button. Select the template that matches your application. For this post Azure App Service deployment is the one we need.
The next thing to will be to rename the environment for something else than Stage 1, I named mine "to Azure" but it could be dev, prod or anything that make sense for you. Click on the Add an Artifact button.
You will now specify to the pipeline were to pick the artifacts it will deploy. In this case, we want the "output" of our latest build. And I renamed the Source alias as Drop.
To get our continuous deployment (CD) we need to enable that trigger by clicking on the little lightning bolt and enabled it.
The last step to configure the Release pipeline is to specify a destination. By clicking on the "1 job, 1 task" in the middle of the screen (with the little red exclamation point in a circle), that will open the window where we will do that.
Select the subscription you would like to use, and then click on the Authaurize button on the right. Once it's done go change the App Service Name. Click on it and wait 2-3 seconds you should see the app we created with our Azure CLI display. Select it, and voila!
Now add a ReadMe.md file by checking out the code on your local machine or directly in Azure DevOps. Grab a badge from the build and/or release and copy paste it in the ReadMe. To get the code snippet of your badge, go to your build/ release definition, and click the ellipse button. Select Status badge and copy the snippet that matches your destination file (in our case the Markdown).
Now when you go to the Overview page, you will have a nice badge that informed you. It also works on any web page just use the HTML snippet instead.
10 Reasons to Use Durable Functions (Mark Heath) - To celebrate his new course about durable function, Mark shares with us his top10 of the best reason with should use durable functions.
Creating PDF on ASP.NET Core (Gunnar Peipman) - Am bookmarking this one. Creating PDF is a common task and that code look "simple".
Data
Power BI Desktop May Feature Summary (Amanda Cofsky) - The monthly updates is always a great new. This month shows more about that new Q&A feature... You may not know about it, but you really want to use it...
Data Encodings and Layout (Clemens Vasters) - Very useful and deep article that provides the best practices for data encoding for different type of situation.
Books
Exactly What to Say, The Magic Words for Influence and Impact
(Phil M. Jones)
I listen to this audio book and really enjoy it. Simple powerful key works selection tat helps us to get where we want to go. It was only about two hours long and I listen to it in one shoot. And I’m mostly certain I will listen to it again.
ISBN 9780692881958
Azure App Service is really 2 services, not 4 (Chris Pietschmann) - This is an interesting post that explains how and why the Azure Apps are packages that way. Once you understand that you see that you will not be limited by your initial pick.
Migrate a Storage Account to ARM (Alexandre Brisebois) - Important PowerShell tooling that we should ALL have... A least if you've been doing some Azure for a little while.
Visual Studio Tools for Azure Functions (Andrew B Hall) - Since the day one of Azure Functions, this tool is requested by the community. The early adopter can now start using this first preview.
Check out Azure Test Drives in preview (Bryon Surace) - If you wanna test an application on Azure without subscription or anything... Look at test drives.
General availability of Premium tier (Pranav Rastogi) - Great announcement, plus details about the difference between the regular and the premium version.
Announcing Azure Portal general availability (Leon Welicki) - The portal finally gets to the quality level that was targeted by Microsoft... well, long time ago. The portal will still continue to evolve, but it's now a full fledge product.
Glimpse at Application Insights Telemetry (Beckylin Orooji) - Awesome news, the great tools that or now integrated together. I'm really looking forward to trying that.
PowerShell Tests released on GitHub (Karol Kaczmarek, Steve Lee, David Wilson) - Nice announcement from the powershell team that shared on github their tests' strategy... Expect some Pester!
Microsoft Azure Essentials_ Fundamentals of Azure (Michael S. Collier & Robin E. Shahan) - This week a felt like returning to the sources, and read the essentials. Difficult to summarize a summary, but all principal family of features are approached and the “must have” tools are over… Even some scenarios. A really good book, evenmore it’s for all.


 Cloud
Cloud Cloud
Cloud Extreme Ownership: How U.S. Navy SEALs Lead and Win


 Cloud
Cloud Exactly What to Say, The Magic Words for Influence and Impact


 Microsoft Azure Essentials_ Fundamentals of Azure
![IMG_20150425_120539[1]](https://blogger.googleusercontent.com/img/b/R29vZ2xl/AVvXsEg9rKgVcXVDyk_aLi2yDByZ-UMLDswmxhaaaYEMHl3B85PTF1ofk5QEUtCxdI9qrMjR27ZiW0pQGWensNtCQt-Z6T9y_qCs64vas6bYpyi2aG070dlT3qt6o1mUSwnkI-pXmarA0x5pm70/s1600-h/IMG_20150425_120539%25255B1%25255D%25255B8%25255D.jpg "IMG_20150425_120539[1]")
