
When building a new project, we don't need a big database that scales and has lots of data, but we do still need some kind of data source. Of course, it is possible to fake it and have some hardcoded value returned by an API but that takes time to create and it's not a database. In this post, I want to share a solution to have a portable, self-healing, disposable, disconnected database that doesn't require any installation.
The solution? Put the database in a container! It doesn't matter what database you are planning to use or on which OS you are developing. Most databases will have an official image available on Docker Hub and Docker runs on all platforms. If you feel uncomfortable with containers, have no fear, this post is beginner-friendly.
This post is part of a series where I share my experience while building a Dungeon crawler game. The code can be found on GitHub.
The Plan
Have a database ready at the "press of a button". By "ready", I mean up and running, with data in it, and accessible to all developer tools.
Preparation for the Database
We need a script to create the database schema and some data. There are many ways to achieve this. A beginner-friendly way is to create an empty database and use a tool like Azure Data Studio to help create the SQL scripts. Doing it this way will validate that the script works.
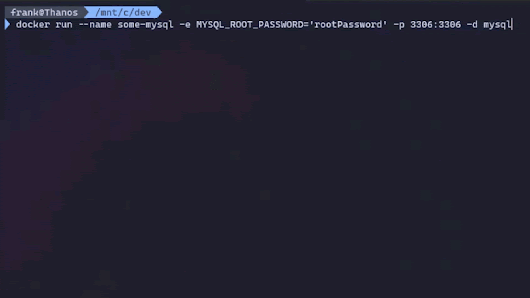
The Docker command to create the database's container will change a little depending on the database you are using but here what's a MySQL one look like:
docker run --name some-mysql -e MYSQL_ROOT_PASSWORD='rootPassword' -p 3306:3306 -d mysql
Where some-mysql is the name you want to assign to your container, rootPassword is the password to be set for the MySQL root user and -d means that the container will run detached. The -p option is used to map the port 3306 of the container to the port 3306 of the host. This is required to be able to connect to the database from the host.
Now, a MySQL server is running inside the container. To connect to the server with Azure Data Studio use the extension MySQL extension for Azure Data Studio. Microsoft has a QuickStart: Use Azure Data Studio to connect and query MySQL if needed. Create a new connection in Azure Data Studio, then create a database (ex: 2d6db).
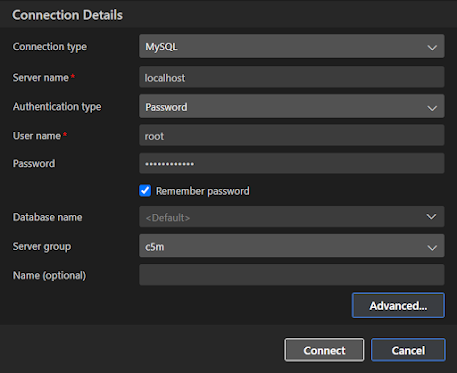
You can use the MySQL command-line tool if you prefer, but Azure Data Studio offers a lot of help when you are not that familiar with SQL. You can even use the Copilot extension and ask it to write the SQL statement for you. It's pretty good!
If you want to learn more about this, check the Open at Microsoft episode: Copilot is now in Azure Data Studio and this is how it can help you! to see it in action.
It's fantastic to generate a first draft of the create statements and to make queries.
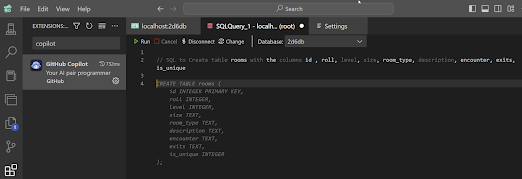
Let's create two SQL scripts. The first one will be to create the schema with all the tables. The idea here is to write the script and execute it to validate the results. Here is an example creating only one table to keep the post simple.
-- schema.sql

CREATE TABLE IF NOT EXISTS 2d6db.rooms (
  id int NOT NULL AUTO_INCREMENT,
  roll int DEFAULT 0,
  level int DEFAULT 1,
  size varchar(10) DEFAULT NULL,
  room_type varchar(255) DEFAULT NULL,
  description varchar(255) DEFAULT NULL,
  encounter varchar(255) DEFAULT NULL,
  exits varchar(255) DEFAULT NULL,
  is_unique bool DEFAULT false,
  PRIMARY KEY (id)
);
Now that there are tables in the database, let's fill them with seed data. For this, the second SQL script will contain insert statement to populate the tables. We don't need all the data but only what will be useful when developing. Think about creating data to cover all types or scenarios, it's a development database so it should contain data to help you code.
-- data.sql

INSERT INTO 2d6db.rooms(roll, level, room_type, size, description, exits, is_unique)
VALUES (2,1,'Empty space', 'small','There is nothing in this small space', 'Archways',false);

INSERT INTO 2d6db.rooms(roll, level, room_type, size, description, exits, is_unique)
VALUES (3,1,'Strange Text', 'small','This narrow room connects the corridors and has no furniture. On the wall though...', 'Archways',false);

INSERT INTO 2d6db.rooms(roll, level, room_type, size, description, exits, is_unique)
VALUES (4,1,'Grakada Mural', 'small','There is a large mural of Grakada here. Her old faces smiles...', 'Archways',true);
Note: You can now stop the database's container with the command: docker stop some-mysql. We don't need it anymore.
Putting All the Pieces Together
This is when the magic starts to show up. Using a Docker Compose file, we will start the database container and execute the two SQL scripts to create and populate the database.
# docker-compose.yml

services:

  2d6server:
    image: mysql
    command: --default-authentication-plugin=mysql_native_password
    environment:
      MYSQL_DATABASE: '2d6db'
      MYSQL_ROOT_PASSWORD: rootPassword
    ports:
       - "3306:3306"
    volumes:
      - "../database/scripts/schema.sql:/docker-entrypoint-initdb.d/1.sql"
      - "../database/scripts/data.sql:/docker-entrypoint-initdb.d/2.sql"
The docker-compose.yml file are in YAML and usually are used to start multiple containers at once, but it doesn't need to. In this scenario, the file defines a single container named 2d6server using just like the previous Docker command and MySQL image and configuration. The last command volumes is new. It maps the path where the SQL scripts are located to /docker-entrypoint-initdb.d inside the container. When MySQL starts it will execute the files in that specific folder in alphabetic order. This is why the scripts are renamed 1.sql and 2.sql, as the table must be created first.
Do get the database up and ready, we will execute the docker compose up.
# start the database
docker compose -f /path_to_your_file/docker-compose.yml up -d

# stop the database
docker compose -f /path_to_your_file/docker-compose.yml down -d
By default, the command looks for a docker-compose.yml file. If you have a different name use the argument -f to specify the filename. Optionally, to free the prompt you can pass the argument -d to be in detached mode.
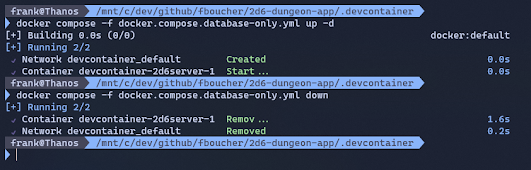
When you are done coding and you don't need the database anymore, execute the docker compose down command to free up your computer. Compared to when the server is installed locally, a container will leave no trace; your computer is not "polluted".
When you need to update the database, edit the SQL script first. When the scripts are ready, execute the docker-compose restart to get the database refreshed.
To Conclude
Now, you only need to execute one simple command get a fresh database, when you want. All the developers don't need to have a database server installed and configured locally. And you don't need to be worried when deleting or modifying data, like when using a shared database. After cloning the repository all developers will have everything they need to start coding.
In a next post, I will share how I used Azure Data API Builder to generate a complete API on top of the database using the same docker compose method.


