It is time to share new reading notes. It is a habit I started a long time ago where I share a list of all the articles, blog posts, and books that catch my interest during the week.
If you think you may have interesting content, share it!
Going Full Time on Open Source with Shaun Walker (.NET Rocks!) - The older will remember the amazing DotNetNuke. That OSS project was create by Shaun a few years ago. In this episode, they talk about his new project and how he is building it.
Miscellaneous
How AI is generating change in newsrooms worldwide (Charlie Beckett) - An interesting post that look at a important question and impact of AI. I didn't thought about it, but of course news are affected by those generative AI tools.
“In this post, I’ll show you how to build an Azure AppFabric adapter for StreamInsight. In the next post, I’ll walk through the steps to deploy the on-premises StreamInsight application to Windows Azure and StreamInsight Austin.”
“As the datacenters get upgraded, the version number of the database engine will increase, which will result in errors when connecting”
“we encourage you to immediately download and install the latest updates to the SQL Server Management Studio (SSMS) tools for managing your SQL Server and SQL Azure databases. The links to get the latest updates available in SQL Server 2008 R2 SP1 are:
“…if you really want to debug and trace an Azure application you had better read this MSDN article which explains how to create custom debugging and trace agents and write logs to Azure storage.”
Ghost Contact Form with Azure Functions (Tom Faltesek) - Being myself a user of both Ghost and Azure function I'm very excited about this new series of posts.
Building offline Blazor application (Gunnar Peipman) - A very interesting post about an experience done with Blazor. It's usually during those that I learn the most.
Introducing the Cake.Discord Addin (Gary Ewan Park) - A few weeks ago I used cake to deploy in Azure and I was very impressed by cake. Its great to see this project continues to evolve and get new addin is very cool.
Marking up the Web with ASP.NET Core and Markdown (Rick Strahl) - So many great ideas and cool projects in this article. If you use Markdown it's a must. If you are not using markdown, hmmm... what?!
Fast Focus (Damon Zahariades) - Great short book. Not like the other of his kind, this book goes right to the point and offers actionable item. It's very practical and accessible to everyone. At the end of the book, you know what to do to get started and improve your focus.
You have a solution that is already deployed in Azure, and you would like to reproduce it. You know that Azure Resource Manager (ARM) template could help you to do that, unfortunately, you don't know how to get started. In this post, I will share with you the best practices and how I implement them while working on ARM template.
How to Get your ARM Template
Of course, you could build your ARM template from scratch. However, there many quickstart templates available on GitHubd. Even more, you could also get Azure to generate the template for you!
If your building a new solution, go in the Azure portal (portal.azure.com) and start creating your resource as usual. But stop just before clicking on the Create button. Instead click on the link on his side named Download template and parameters. That will open a new blade where you will be able to download the template, parameters files, and a few scripts in different languages to deploy it.
If your solution is already deployed, you still have a way to get the template. Again, from the Azure portal, go to the resource group of your solution. In the left option panel, click on Automation script.
Step 1 - Use Git
Once you have your ARM template and a parameter file, move them in a folder and initialize a Git Repository. Even if it's only a local one this will give you an infinite of Ctrl-Z. Doing multiple commit along your journey to get a better and cleaner template, you will always have options to get back when your template was "functional".
A fantastic tool to edit ARM template is Visual Studio Code. It's free, it supports natively Git, and you can install great extensions to help you.
Step 2 - Validate, Validate, Validate, then Commit
az groupdeployment validate --resource-groupcloud5mins --template-file .\template.json --parameters .\parameters.json
Step 3 - Reduce the Number of Parameters
Nobody like tons of questions. Too many parameters is exactly like too many questions. So reduce them to the maximum. We cannot just delete those unwanted parameters, but they are still providing important information. Instead move them in the variables section.
You can do that in different ways, let me share mine. I start with the parameter files and bubble-up any parameter that I would like to keep. Next Cut/Paste all the unwanted parameters to a new file. Then I use the multi-cursor selection of VSCode to clean them in 2 clicks.
Once we have all parameters "converted" in variables, copy them into the variables section of the ARM template. You will need to delete the parameter equivalent from the top of the template.
Now that we have a clean list of parameters, and variables, we must fix the references to the converted parameters. To do that replace all
parameters() references by variables().
For exemple this:
parameters('networkInterfaceName')
will become that:
variables('networkInterfaceName')
Now that we have a more respectable list of parameters, we must be sure that what we expect from them is clear. To do that we have two simple feature at our disposal. The first one of course the name. Use a complete and clear name. Resist the temptation to shorten everything or use too many acronyms. The second is to use metadata description. This information will be displayed to users through the portal as tooltips.
    "adminUsername": {
        "type": "string",
        "metadata": {
            "description": "Name of Administrator user on the VM"
        }
    }
Step 4 - Use Use Unique String
When you deploy in Azure some names are global, and by definition need to be unique. This is why adding a suffix or a unique identifier to your named is a good practice. An excellent way to get an identifier is to use the function uniqueString(). This function will create a 64Bits hash based on the information passed in parameter.
In the example just above, we pass the identifier of the resource group and its name. It means that every time you will be deploying in the same resource group and at that location suffix will be the same. However, if your solution is deployed in multiple locations (for a disaster recovery, or another scenario), suffix will have a different value.
To use it, let's say the name of a virtual machine was passed as a parameter. Then we will create a variable and concatenate the parameter and our suffix.
Then instead of using the parameter inside your ARM template, you will be using this new variable.
Step 5 - Use Variables
One of the great strengths of using ARM template is that we can use them over and over. This is why we want to avoid anything that his static name or value. When we generated template from the Azure portal, these templates are a snapshot of that particular instances. The best way to stay structured and avoid too fixed names is to leverage variables.
When you use an ARM template generated from a "live" and already deployed solution the ARM will contains a lot of very specific information about this instance (Comments, ResourceIDs, States, etc.). When you are building a generic template don't hesitate to delete those.
You may wonder why we need the first variable RGName , since the resource group name is already available through the resourceGroup() function? Some resources, like Azure Blob Storage's name, must only contain lowercase characters. By making a variable we avoid repeating the to toLower() every time.
You can concatenate two, or more variables and/or string with the "very popular" function concat(). Sometimes, the name built by all those string is too long. You can trim it by using the function substring(stringToParse, startIndex, length). In this case, the Azure Blob Storage required a name with a maximum of 24 characters.
The best way to build a good template is to think like the people who will use it. Therefore, a developer may not know what the difference between a Standard_D2s_v3, a Standard_F8 or a Standard_H8. But will clearly know if he needs a medium, a large, or a web development VM.
That means that we will create a parameter with only specific values allowed, and base on that simple selection we will take more specific and technical decision. See the declaration of the following parameter.
    "EnvironmentSize": {
        "type": "string",
        "defaultValue": "medium",
        "allowedValues": [
            "medium",
            "large"
        ],
        "metadata": {
            "description": "Medium for regular development. Large for huge memory usage"
        }
    }
This parameter will only allowed two string "medium" or "large", anything else will return a validation error. If nothing is passed the default value will be "medium". And finally using a metadata description to make sure the purpose of the parameter is clear and well defined.
Then you define your variable (ex: TS-Size) as an object with two properties, or as many as you have allowed values. For each of these properties, you could have many other properties.
Then to use it, we just need to chained the variables and parameter. Notice how we have nested square brackets... This will use the TS-Size.medium.VMSize value by default.
I hope you will find those tips as useful, as I found they are. If you have other suggestions or recommendations, don't hesitate to add them in the comment section or reach me out.
It is time to share new reading notes. It is a habit I started a long time ago where I share a list of all the articles, blog posts, and books that catch my interest during the week.
If you think you may have interesting content, share it!
Creating a VS Code editor extension (Tim Heuer) - The journey of a dev building an extension for Visual Studio Code.A very interesting post.
Open Source
Build an Open Source Project: Behind the Scenes (Alexey Yuzhakov) - This post shares a story of a real-life open source project. It's about putting in the effort and doing the extra work to make our project more useful and accessible.
How to uninstall Scrum (Erwin Verweij) - When you will read that post (because you must read it... Seriously), you will smile, giggle and maybe even laugh.
Cloud
Azure Tips and Tricks Part 14 - Generate SSH public key to log into Linux VM with Cloud Shell (Azure Tips and Tricks Part 14 - Generate SSH public key to log into Linux VM with Cloud Shell was published on September 11, 2017.) - Doing a remote desktop on a Windows VM is trivial, but doing the same thing on a Linux machine required just a little more. After reading this post will be a walk in the park.
Why is Serverless Extensibility better than Webhooks? (Bobby Johnson) - A useful post that jumps right in the middle of the debate about the Webhook and serverless. Both are good but planning (as usual) is worth it.
Programming
API Versioning with Azure API Management (Darrel Miller) - Great post that helps to find the peace, or at least make your ideas, about what kind of rules, you should follow.
Microservices: The Good, the Bad and the Hype (Jennifer Riggins) - Nice post that explains some challenges when doing serversless. Because yes, it's a great architecture plan, but it's not magic.
Every Monday, I share my "reading notes". Those are the articles, blog posts, podcast episodes, and books that catch my interest during the week and that I found interesting.
It's a mix of the actuality and what I consumed. Enjoy!
Suggestion of the week
Approval Workflows With GitHub Actions (Aaron Powell) - Wow! That's a very clever and impressive way to have step flow in GitHub. All the details are in the post if you would like to create your own.
GitHub with Azure DevOps | Premier Developer (GitHub with Azure DevOps) - Very interesting post that explains al the benefits of using this mixt, and why an enterprise would be interested to do that.
193: UI Is Messy (Merge Conflict) - I, once more, had a nice moment listening to that discussion/ argumentation about different patterns pros and cons.
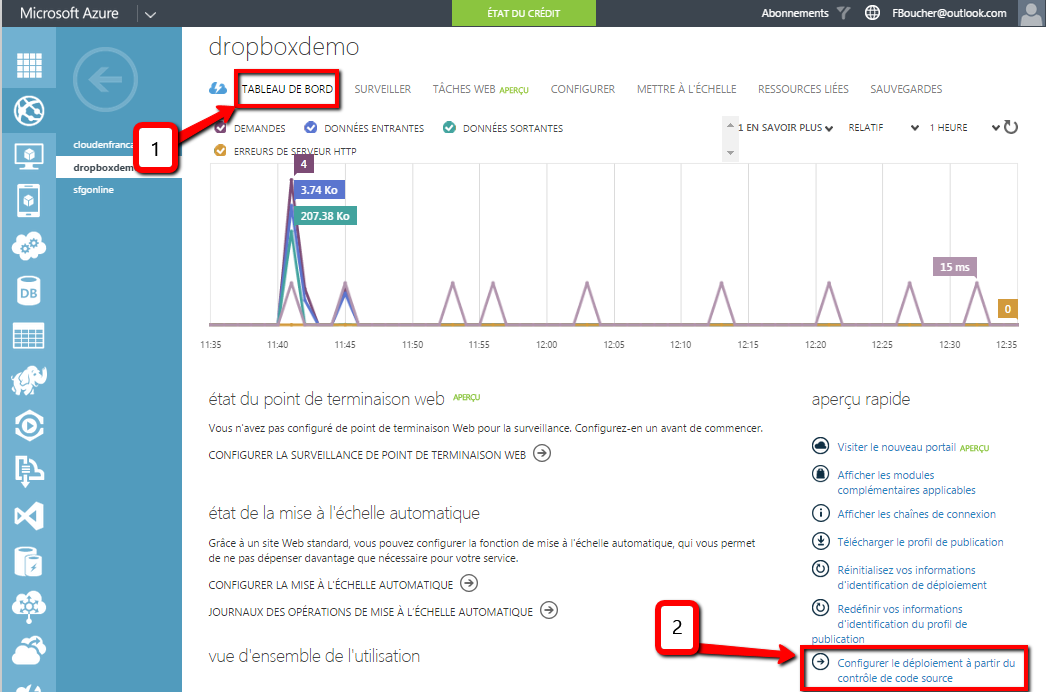
(this post is also available in French)
This post is about creating an automatic deployment that could be used by everyone. I picked Dropbox as source control because today mostly everyone got is account. If you need one, feel free to use this invite it will gives you 500 MB of bonus space for free!
Step 1: Configure the automatic deployment
To configure the deployment, connect to the Azure management portal. Although the new portal is my favourite to manage and visualize information on websites, as I write this post the features needed for the Dropbox deployment were not yet available. We must connect to "old" portal and select the Web site. You a website is not already created you can add one using the quick create.
After selecting the site, you need to click on the option: Set the deployment from source control, which is located at the bottom right of the dashboard code.
From the dropdown list, choose Dropbox and click the arrow. Microsoft Azure deployment will now aks you to have to access on a directory in your Dropbox account.
Step 2: Publish Web Site
From your computer, access Dropbox. If you left the default settings, the directory should be under Apps / Azure / [dirname]. You can now copy the code, images and all other files that you need. After synchronization with DroxBox completed (the small green checks everywhere) you can return to Azure portal.
It is now time to deploy. To do this you need to click Sync.
Once completed you'll get a message informing you that the deployment is done. You can now check the log to see the deployment steps in detail if you wish.
The new version of your website is now available!
Conclusion
Deploy a blog, a static business site, a family owned site with Dropbox is so simple! It`s even better than the good old FTP, if something goes wrong, you can redeploy by one click.
.NET Conf 2023 (Mehul Harry) - Net cof is coming reverse the dates! And for those if you who knows .NET there is a call for paper here is your chance the share your knowledge!
How to deploy Azure Container Apps (Shawn Sesna) - This is a grewt tutorial to get your container Apps deploy without having to care about to much infrastructure aka.kubernetes.
Kevin LaBranche: Leading teams through DevOps - Episode 251 (Azure DevOps Podcast) - Yes! DevOps is not a thing you implement in 2-3 weeks, it takes time. Great episode that highlight even more that it's not about the tech but the way you do things...
Getting Started With NuGet 5.8 (Jon Douglas) - A very interesting post about the new features included in NuGet, and since it is the first one supporting .Net 5, some advice for a better experience.
What is a Developer Game Jam? (Coding Blocks) - Interesting episode about Game Jam... I barely know that universe. Yes, I said universe because it is a completely different world or better another dimension. There are tons of events and participants but you may never hear of that. It's very interesting.
It is time to share new reading notes. It is a habit I started a long time ago where I share a list of all the articles, blog posts, and books that catch my interest during the week.
If you think you may have interesting content, share it!
Understanding C# 8 default interface methods (Andrew Lock) - Very clear post about the new feature available in interfaces, with great examples that make us understand why and when it is useful and how to implement it.
Code Visualization with CodeSee's Shanea Leven (Hanselminutes with Scott Hanselman) - Another very interesting episode. CodeSee definitely catches my attention, I'm planning to try it with my OSS project to get started.
Since I saw Donovan Brown do his demo during the Connect(); // 2016 Keynote, I really want to have a taste of that left click to turn a project to Docker containers. So last Sunday I wake up early and armed with a big bowl of cafe latte start prepping my VM to try it. But as you could imagine, it didn't work on the first attempt, and that what I want to share to you.
Let's get started
I build a new VirtualBox virtual machine (VM) using an ISO of Windows 10, then install all the updates to get the anniversary edition. I afterward went to visualstudio.com to get the Visual Studio 2017 RC and install it with a few components: web, azure, etc. And next when looking for Docker for windows. Same here super easy just need to download and install the MSO from docker.com and voila... or not. Like specified in the Docker documentation the installer noticed that Hyper-V was not present in my environment and suggested installing it and reboot the machine. Until then, everything was going fine, but when Docker try to start, after the reboot, I got an error message:
Error creating machine: Error in driver during machine creation: This computer doesn't have VT-X/AMD-v enabled. Enabling it in the BIOS is mandatory
However, the setting was set, as you can see in the screenshot.
After a short investigation, I found that VirtualBox was not supporting nested virtualization, yet. Well, let's try another virtualization platform then.
First Success
I created a new VM under VMware Player this time and repeated all the steps as before. After the reboot, the little white whale in the system didn't prompt any error... Was it working? Let's try to create a Nginx Hello-world container to check. And the answer was YES!
Docker and Azure
Now let's get serious. It's time to do the left click on the project and add Docker Project Support. Then press F5 to try it locally.
ERROR: for mystuff Cannot create container for service mystuff: C: drive is not shared. Please share it in Docker for Windows Settings Encountered errors while bringing up the project..
I got too excited, and I had skipped some reading... It's written black on white in the documentation that you need to share some drive to make it work.
After that it when smoothly and in few minutes, I got my website to run in a Docker container accessible via localhost:32768. Great! Now to get it available on Azure, I need to create a registry where all the images will be saved. To do that simply left click again on the project, and select Publish. The guided dialog will popup and help you to create and deploy your things. An interesting point is before clicking the "Create" button you will have the option to export your template as a json file, very useful. But for now click Create, then Publish.
After a moment you should have a new browser window that will popup with your App now deployed in Azure.
Wow! That was really a great experience. It's definitely a very simple process to get started. I really appreciate the Docker for Windows and Kitematic user interface. Of course, all the command-line are still available, but now I also have another option for the day where I feel more for clicking instead of typing.
Let's build it and ship it, from any platform to the cloud!
Making the Complex Simple - Not sure how to "classify" this post, is it a top list of the best bad practices, or literally "du bonbon"? A post to read, and relax.
Writing About Code: Structure - Second part of a very interesting article about how to write. This
one is all about get our writing in a good shape. Because well structured our post will be easier to read, understand and share.
If one image is worth a thousand words, then it's incredible the amount of information you have in Azure Usage And Billing (AUBI). This portal is a open-source project that has been announced a few weeks ago. In this post, I will share my first impressions about it.
The project is still young, but every alive. When I installed it, I had one or two minor issues, but by the time I wrote this post all of them were already fixed.
Where it is?
The Azure Usage And Billing site is not a website like portal.azure.com; it consists of a solution you need to deploy in an Azure subscription. It doesn't require to be the subscription you wish to monitor, just a subscription you have access. The solution contains: two web sides with both Application Insights and one also with webjobs, an SQL Database, a storage account and you will also need to deploy a Power BI report.
All of it can be easily deployed using the PowerShell script and Azure Resource Manager (ARM) template included. Only a few manual steps will be required. Hopefully, a very clear and completed documentation is available in video or written. Both present on the Github project page.
What can I do with it?
Once fully deployed, you will need to navigate to your instance of the Registration portal (ex: http://frankregistrationv12.azurewebsites.net) and register all the subscriptions you want. After the webjobs are finished bringing all the data, they will all be available in the Power BI Reports.
Power BI does an incredible work by showing all the information about your subscription(s). A very useful point here is that all information present in the dashboard is interactive! Whatever you select simply one or many subscriptions or only a specific category of Azure service, all the other tiles will be automatically adjusted.
What's Next?
If it's not already done, I highly recommend installing the AUBI portal and start enjoying the detail of all that information available to you without any effort, and presented in such a beautiful way. For all the details about the prerequisites or the install procedure got to the Github project page.
Cloud Comments .net - Discuss about the new price drop of AWS and the lack of tools to help to calculate the cost, or to compare it with the usual on premise solution.
Moving SQL Azure Servers Between Subscriptions (R Syam Kumar) - It's now eaiser than ever to move a database between different Azure subscription. that all possible to a new feature that been add:Server Move in the database section. be aware that price may be different in each subscription.
During the holidays, I embarked on a fun project to create a visual countdown for important dates. Inspired by howmanysleeps and hometime from veebch, I wanted to build a countdown that didn't rely on Google Calendar. Instead, I used a Raspberry Pi Pico and some custom code to achieve this.
After cloning the repo, navigate to the src/NextEvent/ folder and use the Azure Developer CLI to initialize the project:
azd init
Enter a meaningful name for your resource group in Azure. To deploy, use the deployment command:
azd up
Specify the Azure subscription and location when prompted. After a few minutes, everything should be deployed. You can access the URL from the output in the terminal or retrieve it from the Azure Portal.
How to Set Up the Raspberry Pi Pico
Edit the config.py file to add your Wi-Fi information and update the number of lights on your light strip.
You can use Thonny to copy the Python code to the device. Copy both main.py and config.py to the Raspberry Pi Pico.
How It Works
The website creates a JSON file and saves it in a publicly accessible Azure storage.
When the Pi is powered on, it will:
Turn green one by one all the lights of the strip
Change the color of the entire light strip a few times, then turn it off
Try to connect to the Wi-Fi
Retrieve the timezone, current date, and settings from the JSON file
If the important date is within 24 days, the countdown will be displayed using random colors or the specified colors.
If the date has passed, the light strip will display a breathing effect with a random color of the day.
The Code on the Raspberry Pi Pico
The main code for the Raspberry Pi Pico is written in Python. Here's a brief overview of what it does:
Connect to Wi-Fi: The connect_to_wifi function connects the Raspberry Pi Pico to the specified Wi-Fi network.
Get Timezone and Local Time: The get_timezone and get_local_time functions fetch the current timezone and local time using online APIs.
Fetch Light Settings: The get_light_settings function retrieves the important date and RGB colors from the JSON file stored in Azure.
Calculate Sleeps Until Special Day: The sleeps_until_special_day function calculates the number of days until the important date.
Control the LED Strip: The progress function controls the LED strip, displaying the countdown or a breathing effect based on the current date and settings.
The Configuration Website
The configuration website is built in C#. It's a Blazor server webapp, and I used .NET Aspire to make it easy to run it locally. The UI uses FluentUI-Blazor so it looks pretty, without effort.
The website allows you to update the settings for the Raspberry Pi Pico. You can set the important date, choose custom colors, and save these settings to a JSON file in Azure storage.
Little Extra
The website is deployed in Azure Container App with a minimum scaling to zero to save on costs. This may cause a slight delay when loading the site for the first time, but it will work just fine and return to "dormant" mode after a while.
I hope you enjoyed reading about my holiday project! It was a fun and educational experience, and I look forward to working on more projects like this in the future.
What's Next?
Currently the project does a 24 days countdown (inspired from the advent calendar). I would like to add a feature to allow the user to set the number of days for the countdown. I would also like to add the possibility to set the color for the breathing effect (or keep it random) when the important date has passed. And lastly, I would like to add the time of the day when the light strip should turn on and off, because we all have different schedule 😉 .
Last thoughts
I really enjoyed doing this project. It was a fun way to learn more about the Raspberry Pi Pico, micro-Python (I didn't even know it was a thing), and FluentUI Blazor. I hope you enjoyed reading about it and that it inspired you to create your own fun projects. If you have any questions or suggestions, feel free to reach out, I'm fboucheros on most socials.