Épisode 84 - Le bonheur de s’entraîner (Grand écart) - I'm not a runner, but I like (or use to) move and be outside. This francophone podcast is really motivating, and interesting.
Eating Frogs with Brian Tracy (The Productivityist Podcast) - I just found this podcast. I liked that book when I read it a few years ago. It was nice listening to this episode talking about it. Brought back great ideas.
Épisode 5 - La Chasse aux Sorcières (Les Pires Moments de l'Histoire) - Okay, THIS IS A MUST. Seriously is yo understand French, it's both educational and funny. Great job!
2020 sucked - A year-end wrap-up with Scott's Wife, Mo (Hanselminutes with Scott Hanselman) - I'm so glad Mo accepted to comes on the show once more. This dynamic is very interesting. I need to make my wife listen to this episode and to my daughter too (she studying to be a nurse).
628 - How to Be Confident, Not Arrogant (Modern Mentor) - The line between those two is easy to cross. I appreciated the reflection time about it, that this episode offers.
The Infinite Game with Dr. James Carse (A Bit of Optimism) - The Infinite Game, a great book that I read last year. It was awesome to listen to Simon talk about those ideas with Dr. Carse.
I'm not a Docker master, but I understand that it's very useful and I like to use it from time to time in some projects. Another thing I like is DevOps and automation and in a project I have, I was missing that. In the previous setup, the container was built and publish to DockerHub with the date as a tag. Nice but not very easy to now with versions are "stable" and wish one are "in progress".
This post is about how I build a continuous integration and continuous deployment solution for my docker project. All the code is on GitHub and Docker Hub. I sharing my journey so others can enjoy that automation and not spend a weekend building it.
The Goal
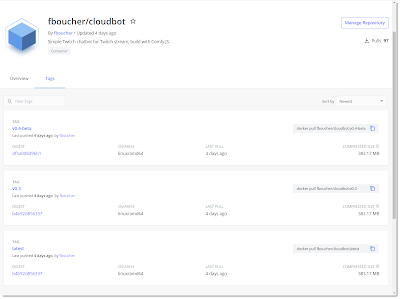
By the end of this build, there will be two GitHub Action to build and publish a different version of the application on Docker Hub.
The release version: every time a release is published on GitHub a container tag with the matching version number will be built and published. (ex: myapp:v1)
The beta version: At every push in my branch on GitHub a container will be published with a specific tag. The tag will be matching the draft release version number with -beta. (ex: myapp:v2-beta).
In this post, the application is a Node.js Twitch chatbot. The type of application is not important the post focus on the delivery.
Publishing the release version
Every time a release is published on GitHub, the workflow will be triggered. It will first retrieve the "release version" then build and tag the container with it and finally publish (aka push) it to Docker hub. Because a "release" is also a "stable" version it will also update the container tag latest.
Let's look at the full YAML definition of the GitHub Action and I will break it down after.
name: Release Docker Image CI

on:
  release:
    types: [published]
jobs:
  update:
    runs-on: ubuntu-latest
    steps:
    - uses: actions/checkout@v2
    - name: Set outputs
      id: vars
      run: echo ::set-output name=RELEASE_VERSION::$(echo ${GITHUB_REF:10})
    - name: Publish to Registry
      uses: elgohr/Publish-Docker-Github-Action@master
      with:
        name: ${{secrets.DOCKER_USER}}/cloudbot
        username: ${{ secrets.DOCKER_USER }}
        password: ${{ secrets.DOCKER_PASSWORD }}
        tags: "latest,${{ steps.vars.outputs.RELEASE_VERSION }}"
To limit how many times the workflow is triggered I used on: release and the type: published, adjust as you like.
The next interesting part is the lines in the step vars.
- name: Set outputs
    id: vars
    run: echo ::set-output name=RELEASE_VERSION::$(echo ${GITHUB_REF:10})
Here I use the environment variable GITHUB_REF (striped of the 10 first characters contains "refs/tags/") to initialize a local variable RELEASE_VERSION. The value is available from the outputs of that step, like on the last line of the YAML.
From the steps identified by the id vars I retrieved from the outputs the value of RELEASE_VERSION.
In this GitHub Action, I used elgohr/Publish-Docker-Github-Action@master because it was simple and was doing what I need. You can execute docker commands directly if you prefer or use the docker/github-actions.
Every time a push is done on GitHub, the workflow will be triggered. It will first retrieve the "release version" of the most recent release in draft mode. The workflow will happen -beta to the retrieved version and use this to tag the container. Finally, publish (aka push) it to Docker hub.
Once more, here full YAML, I will break it down after.
Here the difficulty was that I wanted to create a tag from a "future" version. I decided to use the Draft Releases because those are not visible by everyone, therefore they look like the future.
If your last release is version 1 (v1.0), to make this workflow possible you will need to create a new release and save it in Draft.
Like in the Release workflow, I need to retrieve the version. Because drafts are only visible to some people we will need to get access. This is easily done by using a github.token. Those are created automatically when the GitHub Action starts.
And voila, a very simple and easy to implement ci-cd for a container project. There are many different options, looking forward to learning how you did yours?
Preventing Developer Burnout in the Age of Rapid Software Delivery (James Brotsos) - This post is definitely interesting as it talks about a real health problem. at the same time there that mix with DevOps and security thing... Could be just me, interesting nevertheless.
The Shorts -- Backyard Adventures (The Dirtbag Diaries) - One thing keep coming back to my head again and again as I was listening... Yeah, so true! I love it. Let's do small adventure.
227: Databases! (Merge Conflict) - So many great questions, a tons of answers, hypotheses, and laughs. Great show guys!
What a great book. I didn't know John Wooden before, but I am very impressed and inspired by both coach Wooden and the author. There is so much in this book and worth reading it again... But first, let's get prepare :)
15+ Chrome extensions you should have in your pocket. (Jane Tracy) - A nice list of extensions. I have a few of them already. It's Always hard to find the balance between all the ones that are great and what you really need.
YouTube Channel Art Ultimate Guide (Your Thriving Side Hustle) - I really go show. I was just thinking about that in fact, the timing was excellent! Very interesting..
Every Monday, I share my "reading notes". Those are a curated list of all the articles, blog posts, podcast episodes, and books that catch my interest during the week and that I found interesting. It's a mix of the actuality and what I consumed.
You think you may have interesting content, share it!
GitHub Docs are now open source (Janice Niemeir) - Open-source documentation is the best. Faster updated, often more accurate and complete... And all of it at one URL easy to remember fantastic.
#54: Yihua Zhang - From Fitness to Coding [S03-E12] (The Solo Coder Podcast) - WHen you like what you are doing I think it shows. It doesn't mean you will always be a super start, but at least you will be happy and most of the time it will be really good for your career. Fantastic story, inspiring.
Microsoft Identity for Developers (CloudSkills.fm) - Nice episode I think Identity/security is a really hard topic to abort, and those guys are doing a great
Every Monday, I share my "reading notes". Those are a curated list of all the articles, blog posts, podcast episodes, and books that catch my interest during the week and that I found interesting. It's a mix of the actuality and what I consumed.
You think you may have interesting content, share it!
Announcing Entity Framework Core (EFCore) 5.0 RC1 (Jeremy Likness) - This awesome post is full of examples showing the differences with the previous versions. It shows how to get started and of course all the new features.
Morning Brew - Newsletters ARE NOT Dead! (That Creative Life) - A great conversation between to young and really smart creator. It's interesting to confirm you are not alone asking yourself those questions.
Are YouTube Keyword Research Tools Worth It? (Your Thriving Side Hustle) - Do you spend time entering all that metadata? Sometimes I wonder if I'm the only one doing it, and the second haft of the time I'm sure I'm doing it wrong. Nice episode.
Cloud & DevOps with Bart Castle (CloudSkills.fm) - I love those stories how someone became who they are. THe path to picked, the choices they made with the reason why.
Special Episode 25: From art school to Microsoft Research (Software Engineering Unlocked) - Wonderful, I knew her study. carreer path couldn't be strait. Like I mentioned many times the best stories are the one with "detours". Love it, looking forward for the next episode.
Introducing C# 9: Extending Partial Methods (Anthony Giretti) - It's been a while since a used them, but it nice to see it will be much easier...because I remember how it was.
The DevOps Journey (Chris Ayers) - Interesting post about DevOps in our reality.
Linus Tech Tips Returns for Episode 100! (That Creative Life) - I was really happy when I saw that Linus was back on the show. I really like to dynamic between those two, it feels honest and true.
I was interested to read this book to get some inspiration when it's time to talk to people in an event. But this book brought me way more then that. I really appreciated the clear example and the variety. After reading this book you won't be a master, but you now have options to start a conversation.
211: Failure To Launch (Merge Conflict) - Interesting conversation about when it's time to stop adding features and deploy. Finding a comfortable point could be difficult sometime.
Stop Pushing Down Your Emotions (Developer Tea) - I think a lot of people are doing that, me included. Very interesting podcast about a real situation.
How the OBS Project changed video forever with lead Hugh Bailey (Hanselminutes with Scott Hanselman) - I was trilled to listen to this podcast. I'm a regular user of OBS and it was wonderful to learn more about this project. I will definitely be lurking on the GitHub side...
Episode 219: Remote crickets and Manager Careering (Soft Skills Engineering) - A really nice episode. Great topics answering diverse questions. One that kept my attention was about the magic manager and the time management...
How to Improve Time Management with Angela Proffitt (Influencer Entrepreneurs with Jenny Melrose) - A few great tips to improve our efficiency at managing time. It's always good to have new ideas and ear how others are doing.
Red Teaming with Leron Gray (Hanselminutes with Scott Hanselman) - A quite interesting episode about playing the bad guys for the good cause. I enjoyed each second of this episode. I new those them existed, but it's great to learn more about them.
Baking Bread with Eric Wolfinger (Wild Ideas Worth Living) - I've been doing my bread for probably fifteen years, and just recently start messing around with sourdoughs... I'm not crazy.. Making bread is both simple and complex... and of course so fun.
Bring your own machine to Visual Studio Online | Visual Studio Blog (Allison) - Fantastic news! Before it was possible to access a powerful developer environment from our poor local devices. Now we can also access our own powerful machine from elsewhere! That's very very nice!
195: The Hanselman Machine Learning Model (Merge Conflict) - Great episode where Frank and James discuss how James could build a sentiment analysis of Hanselman tweets, is it possible or not and what would be the cost (effort, and money).
GitHub Actions with Enrico Campidoglio (.NET Rocks!) - I think it's my first .Net Show since the Pandemie. Well with was a create show that dig deeper in the GitHub Action. Loved it.
068: How to Build Your Personal Brand (CloudSkills.fm) - I really liked this episode as I did "created" my personal brand (without really realizing it ) a few years ago.
455: How to Create Great Relationships, with Colleen Bordeaux (Coaching for Leaders) - Interesting discussion with the author of the book: Am I Doing This Right?: A Philosophical Guide to Life in the Age of Overwhelm, that is now in my to read list/
Every Monday, I share my "reading notes". Those are the articles, blog posts, podcast episodes, and books that catch my interest during the week and that I found interesting. It's a mix of the actuality and what I consumed. Enjoy!
Des fonctions courtes, qui font une chose (Les Semi-Colons) - First time for me listening to this podcast, third time for them. A very interesting podcast in "Canadian French". They are passing through the book Clean Code of Robert C. Martin. This episode was about chapter 3.
vygl - Le balado Ep.17 (vygl) - Great podcast in French. It was my first try and I really liked it. We can ear the experience of the speaker in their voice but also by the quality of this audio.
An Update on the MSDN and TechNet Migration to docs.microsoft.com (Jeff Sandquist) - It was looking mostly like an impossible mission, but with a lot of work, it is really incredible the things that can be achieved. This post shares the status of the migration of each section.
Every Monday, I share my "reading notes". Those are the articles, blog posts, podcast episodes, and books that catch my interest during the week and that I found interesting.
It's a mix of the actuality and what I consumed.
Enjoy!
Azure Free Account? Is it really free? ( Michael Crump) - Ooh yeah! I still remember that moment where I created my first service.... Get started free is free.
Every Monday, I share my reading notes. Those are the articles, blog posts, podcast episodes, and books that catch my interest during the week and that I found interesting. It's a mix of the actuality and what I consumed.
How to Prepare for a Successful Cloud Migration (Aaron Woods) - This post list the questions we should ask ourselves before migrating. This will definitely help to reduce the bumps of a migration.
Every week, I publish my reading notes. Those are the articles, blog posts, podcast episodes, and books that catch my interest and that I found interesting. It's a mix of the actuality and what I was looking for.
SPI 402: Everyone Needs to Have a Podcast (Pat Flynn) - Very interesting episode that explains why... with numbers and examples... Guess what just popped on my project list...
Visualizing Your Work Schedule (Valentin Sawadski) - Interesting project.I'm always looking forward to the best way to track my time and see where I put my effort (aka time).
Every week, I publish my reading notes. Those are the articles, blog posts, podcast episodes, and books that catch my interest and that I found interesting. It's a mix of the actuality and what I was looking for. This one is the last of 2019!
Upgrading the Blazor HTML Table with FlexGrid ( Alvaro Rivoir) - This is a great tutorial that explains very clearly step by step how to replace the grid in the default Asp.Net Core project.
Miscellaneous
Advice to my 20 year old self (Scott Hanselman) - An Interesting post. But to be honest, the more I think about it the less I would spoil things. So as good or bad as it sounds, my advice would probably just be something like thrust yourself, you'll be fine.
You hear about that new GitHub Actions. Or maybe you didn't but would like to add a continuous integration, continuous deployment (CI-CD) to your web application. In this post, I will show you how to add a CI-CD to deploy automatically to Azure using the GitHub Actions.
What are GitHub Actions
GitHub Actions are automated workflows to do things. One of these could be a CI-CD. Using a workflow you could decide to compile and execute some unit tests at every push or pull request (PR). Another workflow could be that you deploy that application.
In this article, I will deploy a .Net Core application in Azure. However, you can use any languages you would like and deploy anywhere you like... I just needed to pick one :)
Now, let's get started.
Step 1 - The Code.
We need some code in a GitHub repo. Create a GitHub repo, clone it locally. And your app in it. I created mine with dotnet new blazorserver -n cloud5minsdemo -o src. Then commit and push.
Step 2 - Define the workflow
We got the code, now it's time to define our workflow. I will be providing all the code snippets required for the scenario cover in this post, but there is tons of template ready to be used available directly from your GitHub repository! Let's have a look. From your repository click on the Action tab, and voila!
When I wrote this post, a lot of available templates assumed the Azure resources already existed and you and adding a CI-CD to the mixt to automated your deployment. It's great but in my case, I was building a brand new web site so those didn't fit my needs. This is why I created my own template. The workflow I created was inspired by Azure/webapps-deploy. And there a lot of information also available on Deploy to App Service using GitHub Actions.
Let's add our template to our solution. GitHub will look in the folder .github/workflows/ from the root of the repository. Then create a file with the extension .yml
Here the code for my dotnet.yml, as any YAML file the secret is in the indentation as it is whitespace sensitive:
on: [push,pull_request]

env:
  AZURE_WEBAPP_NAME: cloud5minsdemo   # set this to your application's name
  AZURE_GROUP_NAME: cloud5mins2

jobs:
  build-and-deploy:
    runs-on: ubuntu-latest
    steps:

    # checkout the repo
    - uses: actions/checkout@master

    - name: Setup .NET Core
      uses: actions/setup-dotnet@v1
      with:
        dotnet-version:  3.0.101


    # dotnet build and publish
    - name: Build with dotnet
      run: dotnet build ./src --configuration Release
    - name: dotnet publish
      run: |
        dotnet publish ./src -c Release -o myapp

    - uses: azure/login@v1
      with:
        creds: ${{ secrets.AZURE_CREDENTIALS }}

    - run: |
        az group create -n ${{ env.AZURE_GROUP_NAME }} -l eastus
        az group deployment create -n ghaction -g ${{ env.AZURE_GROUP_NAME }} --template-file deployment/azuredepoy.json


    # deploy web app using Azure credentials
    - name: 'Azure webapp deploy'
      uses: azure/webapps-deploy@v1
      with:
        app-name: ${{ env.AZURE_WEBAPP_NAME }}
        package: './myapp'

    # Azure logout
    - name: logout
      run: |
        az logout
The Agent
There is a lot in there let's start by the first line. The on: is to define the trigger, in this case, the workflow will be trigger at every push or PR.
The env: is where you can declare variables. It's totally optional, but I think it will help then templates are more complex or simply to reuse them easily.
Then comes the jobs: definition. In this case, we will use the latest version of Ubuntu as our build agent. Of course, in a production environment, you should be more specify and select the OS that matches your needs. This job will have multiples steps defined in the, you guess it, steps: section/
We specify a branch to work with and set up our agent by:
And it would be a better idea to set the version as an environment variable to be able to change it quickly.
The next two instructions are really .Net Core focus as they will build and package the application into a folder myapp. Of course, in the "section" you could execute some unit test or any other validation that you may find useful.
To have our GitHub Action to be able to create resources and deploy the code it needs to have access. The azure/login@v1 will let the Action login, using a Service Principal. In other words, we will create an authentication in the Azure Active Directory, with enough permission to do what we need.
This will create a Service Principal named "c5m-Frankdemo" with the role "contributor" on the subscription specified. The role contributor can do mostly anything except granting permission.
Because no resources already existed the GitHub Action will require more permission. If you create the Resource Group outside of the CI-CD, you could limit the access only to this specific resource group. Using this command instead:
The Azure CLI command will return a JSON. We will copy-paste this JSON into a GitHub secret. GitHub secrets encrypted secrets and allow you to store sensitive information, such as access tokens, in your repository. To access them go in the Settings of the repository and select Secrets from the left menu.
Click the Add a new secret button, and type AZURE_CREDENTIALS as the name. It could be anything, as long as you use that value in the YAML file describing the workflow. Put the JSON including the curly brackets in the Value textbox and click the save button.
Provisioning the Azure Resources
Now that the workflow has access we could execute some Azure CLI commands, but let's see what missing:
- run: |
    az group create -n ${{ env.AZURE_GROUP_NAME }} -l eastus
    az group deployment create -n ghaction -g ${{ env.AZURE_GROUP_NAME }} --template-file deployment/azuredepoy.json --parameters myWebAppName=${{ env.AZURE_WEBAPP_NAME }}
The first command will create an Azure Resource Group, where all the resources will be created. The second one will deploy the website using an Azure Resource Manager (ARM) template. The --template-file deployment/azuredepoy.json tells us the template is a file named azuredeploy.json located in the folder deployment. Notice that the application name is passed to a parameter myWebAppName, using the environment variable.
An ARM template is simply a flat file that a lot like a JSON document. Use can use any text editor, I like doing mine with Visual Studio Code and two extensions: Azure Resource Manager Snippets, and Azure Resource Manager (ARM) Tools With those tools I can build ARM template very efficiently. For this template, we need a service plane and a web App. Here what the template looks like.
This template is simple, it only contains the two required resources: a service plan, and a web app. To learn more about the ARM Template you can read my other post or check out this excellent introduction in the documentation.
Once the template is created and saved in its folder.
The deployment
There are only two last steps to the YAML file: the deployment and logout. Let's have a quick look at the deployment.
Now that we are sure the resources exist in Azure we can deploy the code. This will be done with azure/webapps-deploy@v1 that will take the package generated by dotnet into myapp. Since we are already authenticated there is no need to specify anything at this point.
Everything is ready for the deployment. You just need to commit and push (into master) and the GitHub Action will be triggered. You can follow the deployment by going into the Actions tab.
After a few minutes, the website should be available in Azure. This post only shows a very simple build and deployment, but you can do so many things with those GitHub Actions, like executing tasks or packaging a container... I would love to know how you use them. Leave a comment or reach out on social media.