AWS Step Function Serverless Applications (Gerald Bauer) - What a great tutorial! Very interesting all the plumbing and toolings is explained in this Hello word AWS Lambda.
PowerApps Newbie – getting started (Jen Kuntz) - Nice first post of a promising series ;) To all the #powerusers of planet earth... you want to use PowerApps... so this is your chance to get started!
LINQ Challenge #3 (Mark Heath) - Okay, I know I'm not a LINQ expert but ... I'm curious to see the answers and will definitely give it a try.
Unit Testing in ASP.NET Core Web API (Milos Davidovic) - Great tutorial that explains every bit of the inversion of control and how to create your unit tests.
7 best practices for building containers (Google) - This post helps us to improve our skill with containers. It also shares a lot of excellent more detailed references.
How to Lead When You’re Feeling Afraid (Peter Bregman) - A really interesting post that will help us, for sure, because we all leave this kind of situation one day or the other.
Defeating Electron (Felix Rieseberg) - Pretty good is the chance that you are (just like me) using an application builds on top of electron. This post explains a little about what's it happening under the hood.
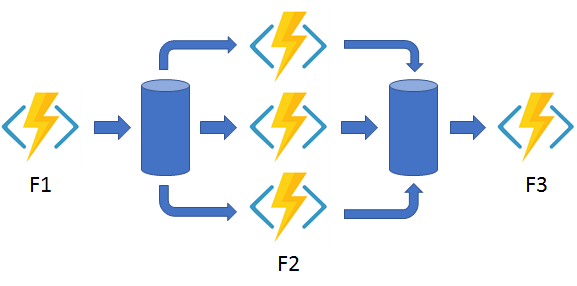
An Introduction to Azure Functions (Matt Soucoup ) - If you are looking to get started on Azure function or looking for the Microsoft serverless offer, this post is definitely a good place to start.
Developing bots for Hangouts Chat (Wesley Chun) - If you are using GSuite and still not leveraging bots... This post is a nice starting point to get inspired.
I have been waiting for this feature for so long! I know; it's not a major feature, but it fills an important gap in the Azure offer. We can now create static websites in the Azure Blob Storage (as I'm writing this post the service is still in preview). In this post, I will explain why I think it's a really good news, show how to create and publish on a static website.
Why It's an Awesome News
The cloud is the perfect place when you need to build something huge very quickly. It's also an excellent solution when you have a lot of variance in the number of resources it required. Because Azure is a service, it will provide you as many resources as you would like in few minutes. And when you are done with the resources you stop paying for them; and it's really great like that!
However, if the only thing you need was to host a little something like a blog or a little website for an event or some temporary publicity Azure was not the best place for it. I mean yes of course, you could build a service and host many little websites on it (Scott Hanselman as excellent posts about that like this one), but it felt always a bit overkill for most of the users. Some people kept an "old style" host provider just for that. I mean it's fine, it works... But with Azure storage, it will be really reliable, and at a lower cost! Let's see how we can create one.
Create a Static Website
To have the static website feature you need to create an Azure Blob Storage account the same way you created them before, however, it needs to be of kind General Purpose V2 (GPV2). Today if you install the Azure CLI Storage-extension Preview, you can use it to create one, or simply go on the portal.azure.com. Let's use the portal since it's more visual.
Once the storage is created, open it. On the left menu of the storage blade, click on the Static website (preview) option. That will open the configuration page for our static website. First, click the Enabled button then enter the initial/ index document name (ex:index.html). Finally, click the Save button on the top of the blade.
The shell for our website is now created. A new Azure Blob Storage container named $web h been created. The Primary and secondary endpoint should now be displayed (ex: https://frankdemo.z13.web.core.windows.net/). If you test this URL, you will see and message saying that the content doesn't exist... and it's normal.
Create some content
This is the part where it all depends on your needs. You may already have some HTML pages ready, or you may want to code them all yourself, or the website may previously exist. For this post, I will create a brand-new blog using a static website generator named Wyam (if you would like to see how to do it with Jekyll, another generator, I used it in the video)
To create a new template with Wyam you use the following command in a command prompt. That will create a new website in the subfolder output.
wyam --recipe Blog --theme CleanBlog
Publish to Azure
It's now time to upload our content to the Azure blob Storage. The easiest is probably directly from the portal. To upload a file, click on the $web container, then the Upload button. From the new form, select the file and upload it.
The main problem with this method is the that it only works one file at the time... And a website usually has many of those...
A more efficient way would be to use Azure Explorer or some script. Azure Explorer doesn't support yet the Azure Storage Static Website, but it will be soon. So that leads us to scripts or command lines.
AzCopy
I really like AZCopy as it's very efficient and easy to use. Unfortunately, as I'm writing this post, AzCopy doesn't support the Azure Storage Static Website. I try to upload all content from the output folder (and sub folders)) with a command like this, but it fails.
An Azure CLI extension preview is also available. Like I mentioned previously, the extension gives you the possibility to create a static website or update the configuration, to upload files you have two options the batch would be more efficient of course, but the file by file option also works. Thanks to Carl-Hugo (@CarlHugoM) for your help with those commands.
I finally tried the Visual Studio Code Stogare Extension. After installing it, you need to add a User Setting Ctrl + ,. Then add "azureStorage.preview.staticWebsites" : true to your configuration. Now you just need to click on the extension, then select Azure blob storage from your subscription, and right click to be able to upload a folder.
Depending on how many files, and their sizes it will take a moment. VSCode will notify you when it's done. You will then be able to get back online and refresh your website to see the result.
Conclusion
I'm very happy to see that feature because it fills a need that was not really cover yet by the Microsoft offer. Right now, it's an early preview so even if the service is very stable, not all the tools support it but that only temporary. Right not you can set your custom domain name, however, HTTPS is not supported.
So what do we do with it? Should we wait or jump right on? Well as the best practices imply when a feature is in preview don't put your core business on it yet. If you are just looking to build a personal website, a little promo than... enjoy!
Power BI and Sudoku – Yes Please (Mike Carlo) - Awesome! I really like when people think outside of the box. This post gives you link to the game and to a more detailed post.
How to use Visual Studio Code (Flavio Copes) - Another post that confirms that VSCode definitely worth our attention. This post gives examples, and shows deferent extensions... If you don't know vscode... Yep start here.
[Invisible Ink: A Practical Guide to Building Stories That Resonate] (Brian McDonald) - We all know it, a story is the element that will give that little plus to our post, and video. This short book explains how to really make an effective one talking about the not visual things... Really interesting.
Azure functions are great. I used to do a lot of "csx" version (C# scripted version) but more recently I switched to the compile version, and I definitely loved it! However, I was looking for a way to keep my deployment short and sweet, because sometimes I don't have time to setup a "big" CI/CD or simply because sometimes I'm not the one doing the deployment... In those cases, I need a simple script that will deploy everything! In this post, I will share with you how you can deploy everything with one easy script.
The Context
In this demo, I will deploy a simple C# (full .Net framework) Azure functions. I will create the Azure Function App and storage using an Azure Resource Manager (ARM template) and deploy with a method named Zip push or ZipDeploy. All the code, script, a template is available on my Github.
The Azure Functions Code
The Azure Function doesn't have to be special, and it can be any language supported by Azure Functions. Simply to show you everything, here the code of my function.
namespace AzFunctionZipDeploy
{
    public static class Function1
    {
        [FunctionName("GetTopRunner")]
        public static async Task Run([HttpTrigger(AuthorizationLevel.Function, "get", "post", Route = null)]HttpRequestMessage req, TraceWriter log)
        {
            log.Info("C# HTTP trigger function processed a request.");

            string top = req.GetQueryNameValuePairs()
                .FirstOrDefault(q => string.Compare(q.Key, "top", true) == 0)
                .Value;

            if (top == null)
            {
                dynamic data = await req.Content.ReadAsAsync< object>();
                top = data?.top;
            }

        return top == null
                ? req.CreateResponse(HttpStatusCode.BadRequest, "Please pass a number to get your top x runner on the query string or in the request body")
                : req.CreateResponse(HttpStatusCode.OK, new { message = $"Hello, here is your Top {top} runners", runners = A.ListOf(int.Parse(top)) });
        }
    }

    class Person
    {
        public string FirstName { get; set; }
        public string LastName { get; set; }
        public int Age { get; set; }
    }
}
It's a really simple function that will return a list of Person generated on the fly. The list will contain as many person as the number passed in parameter. I'm using the very useful GenFu library, from my buddies: ASP.NET Monsters.
The only thing we need to do is to create our compress file (Zip or Rar) that contains everything our project required.
In this case, it's the project file (AzFunction-ZipDeploy.csproj), the function's code (Function1.cs) the host (host.json) and local settings of our function (local.settings.json).
The ARM template
For this demo, we need one Azure Function App. I will use a template that is part of the Azure Quickstart Templates. A quick look to the azuredeploy.parameters.json file and we see that the only parameter we really need to set is the name of our application.
To be able to ZipDeploy, we need to add one Application Setting to let the Kudu interface we need its help to compile our code. To do that let's open the azuredeploy.json and go to the appSettings section. We need to add a new variable named: SCM_DO_BUILD_DURING_DEPLOYMENT and set it to true. After adding the setting it should look like this (see the last one... that's our new one):
Now that all the pieces are ready it's time to put it together one script. In fact, only the two last commands are required; everything else is just stuff to make it easier to re-use it. Check out my previous post 5 Simple Steps to Get a Clean ARM Template, to learn more about the best practices related to ARM template. So let's see that script, it's pretty simple.
    # script to Create an Azure Gramophone-PoC Solution

    resourceGroupName=$1
    resourceGroupLocation=$2

    templateFilePath="./arm/azuredeploy.json"
    parameterFilePath="./arm/azuredeploy.parameters.json"

    dateToken=`date '+%Y%m%d%H%M'`
    deploymentName="FrankDemo"$dateToken

    # az login

    # You can select a specific subscription if you do not want to use the default
    # az account set -s SUBSCRIPTION_ID

    if !( $(az group exists -g  $resourceGroupName) ) then
        echo "---> Creating the Resourcegroup: " $resourceGroupName
        az group create -g $resourceGroupName -l $resourceGroupLocation
    else
        echo "---> Resourcegroup:" $resourceGroupName "already exists."
    fi

    az group deployment create --name $deploymentName --resource-group $resourceGroupName --template-file $templateFilePath --parameters $parameterFilePath --verbose

    echo "---> Deploying Function Code"
    az functionapp deployment source config-zip -g $resourceGroupName -n zipdeploydemo --src "./zip/AzFunction-ZipDeploy.zip"

    echo "---> done <--- code="">
The only "new" thing is the last command functionapp deployment source config-zip. That where we specify to the Azure Function App to look to --src to get our source. Because I'm running it locally, the path is pointing to a local folder. However, you could execute this command also in the CloudShell, and that would become a URI... to an Azure Blob Storage by example.
Deploy and Test
If you didn't notice yet, I did my script in bash and Azure CLI. That because I want my script to be compatible with all platforms. Of course, you could have done it in PowerShell or anything else that would call the REST API.
To deploy, just execute the script passing the ResourceGroup name, and its location.
./Deploy-AZ-Gramophone.sh cloud5mins eastus
To get to Function URL, go to the Azure portal (portal.azure.com) and click on the Function App that we just deploy. Click on the function GetTopRunner in this case, and click on the </> Getfunction URL button.
Use that URL in postman and pass another parameter top to see we the deployment ws successful.
In Video Please
If you prefer, I also have a video version of this post.
New Updates for Azure Development in Visual Studio (Visual Studio Team) - Great update to the tooling that makes our life easier... Or at least that reduce (a lot) the pain when starting and deploying a project.
How I choose which services to use in Azure (Barry Luijbregts, Scott Hanselman) - Oh wow! Very interesting video, presenting a nice and structured way to pick our cloud services.
10 Reasons to Use Durable Functions (Mark Heath) - To celebrate his new course about durable function, Mark shares with us his top10 of the best reason with should use durable functions.
Creating PDF on ASP.NET Core (Gunnar Peipman) - Am bookmarking this one. Creating PDF is a common task and that code look "simple".
Data
Power BI Desktop May Feature Summary (Amanda Cofsky) - The monthly updates is always a great new. This month shows more about that new Q&A feature... You may not know about it, but you really want to use it...
Data Encodings and Layout (Clemens Vasters) - Very useful and deep article that provides the best practices for data encoding for different type of situation.
Books
Exactly What to Say, The Magic Words for Influence and Impact
(Phil M. Jones)
I listen to this audio book and really enjoy it. Simple powerful key works selection tat helps us to get where we want to go. It was only about two hours long and I listen to it in one shoot. And I’m mostly certain I will listen to it again.
ISBN 9780692881958
The Subtle Art of Not Giving a F*ck (Mark Manson) -Damn it's good! The title of the book let's me thought it will be very negative. Not giving a fu#*... But it's really not. Quite the opposite in fact. I really like the book and I'm planning to read/listen it another time in... One year. To see what changed.
Imagine you just arrived at the office. You only took a sip or two of your coffee or tea. You look at the tasks that need to be done today (well yesterday based on the request): a new project is starting, and you need to configure everything the team needs to start building that web application. The need a repository, a continuous integration and continuous delivery (CI/CD) pipeline, a place to deploy, monitoring tools, and of course you need to create an environment where they will be able to track their work. Should you panic? No, because you will use the new Azure DevOps Project available in Azure.
Let's Create the project
From the Azure portal (portal.azure.com) click on the plus button and search for "devops". Select DevOps Project, then click on the Create button. Then follow the five steps and Azure will create everything for you.
What is deployed
Your application from many popular frameworks
Automatic full CI/CD pipeline integration
Monitoring with Application Insights
Git Repository
Tasks/ Bugs tracking board
Deployment to the platform of your choice
In Video please!
Conclusion
The DevOps projects are really fantastic and are very useful. The fact that everything is all packaged together and automatically deployed is a considerable time saver. In short, are the Azure DevOps projects worth it? Oh yeah!
Why Developers Should Install WSL Today (Matt Hyon, August Banks) - I love WSL (aka Bash on Windows). It has evolved, and become something much more. After ready this post you will either install it right away or smile because it's already installed.
Why Responsive Web Design? (Chris Love) - A nice post that explains clearly why you really need to think responsive design, even more in 2018.
The RULES of Blogging (Darren Rowse) - If you are already bloging, or thinking about starting, take two minutes and watch this short video... The rules are.... Simple.
You have a solution that is already deployed in Azure, and you would like to reproduce it. You know that Azure Resource Manager (ARM) template could help you to do that, unfortunately, you don't know how to get started. In this post, I will share with you the best practices and how I implement them while working on ARM template.
How to Get your ARM Template
Of course, you could build your ARM template from scratch. However, there many quickstart templates available on GitHubd. Even more, you could also get Azure to generate the template for you!
If your building a new solution, go in the Azure portal (portal.azure.com) and start creating your resource as usual. But stop just before clicking on the Create button. Instead click on the link on his side named Download template and parameters. That will open a new blade where you will be able to download the template, parameters files, and a few scripts in different languages to deploy it.
If your solution is already deployed, you still have a way to get the template. Again, from the Azure portal, go to the resource group of your solution. In the left option panel, click on Automation script.
Step 1 - Use Git
Once you have your ARM template and a parameter file, move them in a folder and initialize a Git Repository. Even if it's only a local one this will give you an infinite of Ctrl-Z. Doing multiple commit along your journey to get a better and cleaner template, you will always have options to get back when your template was "functional".
A fantastic tool to edit ARM template is Visual Studio Code. It's free, it supports natively Git, and you can install great extensions to help you.
Step 2 - Validate, Validate, Validate, then Commit
az groupdeployment validate --resource-groupcloud5mins --template-file .\template.json --parameters .\parameters.json
Step 3 - Reduce the Number of Parameters
Nobody like tons of questions. Too many parameters is exactly like too many questions. So reduce them to the maximum. We cannot just delete those unwanted parameters, but they are still providing important information. Instead move them in the variables section.
You can do that in different ways, let me share mine. I start with the parameter files and bubble-up any parameter that I would like to keep. Next Cut/Paste all the unwanted parameters to a new file. Then I use the multi-cursor selection of VSCode to clean them in 2 clicks.
Once we have all parameters "converted" in variables, copy them into the variables section of the ARM template. You will need to delete the parameter equivalent from the top of the template.
Now that we have a clean list of parameters, and variables, we must fix the references to the converted parameters. To do that replace all
parameters() references by variables().
For exemple this:
parameters('networkInterfaceName')
will become that:
variables('networkInterfaceName')
Now that we have a more respectable list of parameters, we must be sure that what we expect from them is clear. To do that we have two simple feature at our disposal. The first one of course the name. Use a complete and clear name. Resist the temptation to shorten everything or use too many acronyms. The second is to use metadata description. This information will be displayed to users through the portal as tooltips.
    "adminUsername": {
        "type": "string",
        "metadata": {
            "description": "Name of Administrator user on the VM"
        }
    }
Step 4 - Use Use Unique String
When you deploy in Azure some names are global, and by definition need to be unique. This is why adding a suffix or a unique identifier to your named is a good practice. An excellent way to get an identifier is to use the function uniqueString(). This function will create a 64Bits hash based on the information passed in parameter.
In the example just above, we pass the identifier of the resource group and its name. It means that every time you will be deploying in the same resource group and at that location suffix will be the same. However, if your solution is deployed in multiple locations (for a disaster recovery, or another scenario), suffix will have a different value.
To use it, let's say the name of a virtual machine was passed as a parameter. Then we will create a variable and concatenate the parameter and our suffix.
Then instead of using the parameter inside your ARM template, you will be using this new variable.
Step 5 - Use Variables
One of the great strengths of using ARM template is that we can use them over and over. This is why we want to avoid anything that his static name or value. When we generated template from the Azure portal, these templates are a snapshot of that particular instances. The best way to stay structured and avoid too fixed names is to leverage variables.
When you use an ARM template generated from a "live" and already deployed solution the ARM will contains a lot of very specific information about this instance (Comments, ResourceIDs, States, etc.). When you are building a generic template don't hesitate to delete those.
You may wonder why we need the first variable RGName , since the resource group name is already available through the resourceGroup() function? Some resources, like Azure Blob Storage's name, must only contain lowercase characters. By making a variable we avoid repeating the to toLower() every time.
You can concatenate two, or more variables and/or string with the "very popular" function concat(). Sometimes, the name built by all those string is too long. You can trim it by using the function substring(stringToParse, startIndex, length). In this case, the Azure Blob Storage required a name with a maximum of 24 characters.
The best way to build a good template is to think like the people who will use it. Therefore, a developer may not know what the difference between a Standard_D2s_v3, a Standard_F8 or a Standard_H8. But will clearly know if he needs a medium, a large, or a web development VM.
That means that we will create a parameter with only specific values allowed, and base on that simple selection we will take more specific and technical decision. See the declaration of the following parameter.
    "EnvironmentSize": {
        "type": "string",
        "defaultValue": "medium",
        "allowedValues": [
            "medium",
            "large"
        ],
        "metadata": {
            "description": "Medium for regular development. Large for huge memory usage"
        }
    }
This parameter will only allowed two string "medium" or "large", anything else will return a validation error. If nothing is passed the default value will be "medium". And finally using a metadata description to make sure the purpose of the parameter is clear and well defined.
Then you define your variable (ex: TS-Size) as an object with two properties, or as many as you have allowed values. For each of these properties, you could have many other properties.
Then to use it, we just need to chained the variables and parameter. Notice how we have nested square brackets... This will use the TS-Size.medium.VMSize value by default.
I hope you will find those tips as useful, as I found they are. If you have other suggestions or recommendations, don't hesitate to add them in the comment section or reach me out.


 Suggestion of the week


 Cloud
Cloud
 We all know it, a story is the element that will give that little plus to our post, and video. This short book explains how to really make an effective one talking about the not visual things...


 Cloud
Cloud Exactly What to Say, The Magic Words for Influence and Impact
 Cloud
Cloud
 Cloud
Cloud

