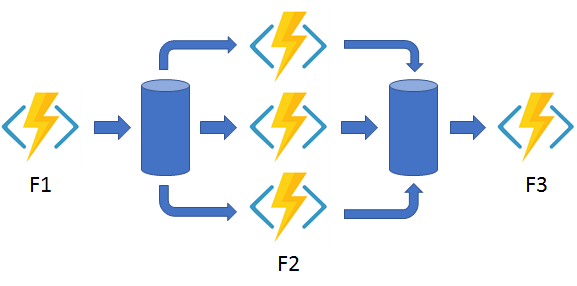
Introduction to Azure Durable Functions (Maxime Rouiller) - This is a great post that explains what are durable functions and shows a simple case to gives context.
The Five Dysfunctions of a Team: A Leadership Fable (Patrick Lencioni) - I really enjoyed this book. The fact the first the material was passed as a story adds a lot of perspective and to our comprehension. In the last chapter the author return to the theories and gives more details. I completely devour that book; I'm looking forward to reading more.
Miscellaneous
paddling.com (Wayne Horodowich) - I could not agree more.
1575 Coding on Twitch with Jeff Fritz (Carl Franklin, Richard Campbell, Jeff Fritz) - Yep developers are also on twitch and they rock. We learn how it all started in this episode.
For a project I have, I wanted to validate if containers were easier to use compare to regular code with services in Azure. I needed to refresh myself with Docker, so I decide to do what I thought would be a simple test: Create an Asp.Net Core web site in a container and access it on my machine.
This post is about my journey to finally achieve this goal, as you may guess it didn't work on the first attempt.
The Goal
One reason why I was looking at containers, it's because it's supposed to be working everywhere right? Well yes but sometimes with a little of effort. The goal here is to be able to run the same container on my main PC, my surface, a Linux VM and of course in Azure.
The context
I have a different setup on my main machine and on my surface. On my PC, I'm using VirtualBox for my VMs so I'm not running Docker for windows, but Docker Toolbox. This flavor (older version) of Docker will create a VM in VitualBox instead of Hyper-V. I couldn't use Docker for Windows like on my Surface, because the two virtualization softwares don't run side by side.
I also wanted to use only tools available on each of this platform, so I decided not to use Visual Studio IDE (the big one). Moreover, I wanted to understand what was happening so I didn't want too much magic involve. Visual Studio is a fantastic tool and I love it. :)
Installing Docker
I needed to install Docker on my Surface. I downloaded Docker Community Edition (CE), and because Hyper-V was already installed everything ran smoothly. On Windows, you need to share the "C" drive from the Docker setting. However, I was getting a strange "bug" when trying to share mine. It was asking my to login with AzureAD and was ignoring my request by letting the share drive unchecked.
Thanks to my new friend Tom Chantler, I did search for too long. See the thing is I'm using an AzureAD account to login, and something is not working right at the moment. As explained in Tom's post: Sharing your C drive with Docker for Windows when using Azure Active Directory, to walkaround this situation, I only had to create a new user account with the exact name as my AzureAD account, but without the AzureAD prefix (ex: AzureAD\FBoucher became FBoucher). Once that was done I could share the drive without any issue.
Let's get started with the documentation
The HelloWord container worked like a charm, so I was ready to create my Asp.Net Core website. My reflex was to go on docs.docker.com and follow the instruction from Create a Dockerfile for an ASP.NET Core application. I was probably doing something wrong, because it didn't work. So I decided to start from scratch and do every step manually... I always learn more that way.
Let's start by the beginning
Before moving everything in a container, we need a web application. This can be easily done from the terminal/ command prompt, with the commands:
dotnet new mvc -o dotnetcoredockerappservicedemo

cd dotnetcoredockerappservicedemo

dotnet restore

dotnet publish -c release -o app/ .
Here we create a new folder with a website using the mcv template. I then go in that new folder and restore the Nuget package. To test the we site locally simply use dotnet run. And finally, we build and publish the application into the subfolder app.
Moving to Docker
Now that we have our app it's time to containerize it. We need to add some Docker instruction in a dockerfile. Add a new file name dockerfile (no extension) to the root folder and copy/paste these commandes:
To start Docker with Docker Tool just start the Docker Quickstart Terminal
This instruction will specify how to build our container. First, it will download the image microsoft/aspnetcore or microsoft/dotnet:2.1-aspnetcore-runtime. We specify the work directory, then copy the app folder to app folder inside the container. Finally, we specify the entry point of our application telling it to start with dotnet.
Like Git and it's gitIgnore file docker has the same thing with .dockerignore (no extension). Add that file into your folder to ignore the bin and obj folder.
# .dockerignore
bin\ obj\
Now that the instructions about how to build our container are completed, we can build our container. Execute the following command:
docker build -t dotnetcoredockerappservicedemo .
This will build dotnetcoredockerappservicedemo from the current folder.
Running Docker container locally
Everything is in place, the only thing missing is to run it. If you want to run it locally just go with this command:
docker run -p 8181:80 dotnetcoredockerappservicedemo
On my machine, the port 80 is always used. So I remap the port 80 to 8181, feel free to change it at your convenience. The website will be available at localhost:8181
If you are running Docker Tool (older version of Docker), you need to get the IP of your VM. To get it do
docker-machine ip
Running in the cloud
To run our container into Azure you will need to publish it to the cloud first. It could be on DockerHub or in a private registry on Azure. I decided to go with Azure. First, we need to create a registry, then publish our container.
az group create --name dotnetcoredockerappservicedemo --location eastus

az acr create --resource-group dotnetcoredockerappservicedemo --name frankContainerDemo01 --sku Basic --admin-enabled true

az acr credential show -n frankContainerDemo01
The last command az acr credential show will provides information to tag our container with our repository name and also gives us the credential to be able to push. Of course, you could go to the portal.azure.com and get the information from the Registry's Access Keys blade.
docker tag dotnetcoredockerappservicedemo frankcontainerdemo01.azurecr.io/dotnetcoredockerappservicedemo:v1
Let's connect our docker to our registry, and then push (upload) our container to Azure.
# The https:// is important...

docker login https://frankcontainerdemo01.azurecr.io -u frankContainerDemo01 -p <Password_Retreived>

docker push frankcontainerdemo01.azurecr.io/dotnetcoredockerappservicedemo:v1
Great the container is in Azure. Now let's create a quick webApp to see it. We could also use the Azure Container Instance (ACI) that would be only one command, but because the demo is a website, it won't make sense to use ACI for that.
To get an Application service, we need a Service plan, and then we will create an "empty" webapp. To do that we will specify the runtime without providing any code/binary/container. I wasn't able to create a webapp from a private Azure registry in one command, so this is why I'm doing it in two.
az appservice plan create --name demoplan --resource-group dotnetcoredockerappservicedemo --sku S1 --is-linux

az webapp create -g dotnetcoredockerappservicedemo -p demoplan -n frankdockerdemo --runtime "DOTNETCORE|2.1"
On Windows, I got the following error message: '2.1' is not recognized as an internal or external command, operable program or batch file. The PowerShell command line escape "--%" solves the problem: az --% webapp create -g dotnetcoredockerappservicedemo -p demoplan -n frankdockerdemo --runtime "DOTNETCORE|2.1"
If you check the website right now you should have page saying that the site is up but empty. Let's update the container settings with our registry and container settings.
az webapp config container set -n frankdockerdemo -g dotnetcoredockerappservicedemo --docker-custom-image-name frankcontainerdemo01.azurecr.io/dotnetcoredockerappservicedemo:v1 --docker-registry-server-url https://frankcontainerdemo01.azurecr.io --docker-registry-server-user frankContainerDemo01 --docker-registry-server-password <Password_Retreived>
It's works of course!
Conclusion
It's only four steps: create the .Net Core application, package it into a Docker container, publish our container into our Azure Registry, and create an application service base on that container. However, because all this tech are cross-platform, sometimes you get some little tiny differences between the platform, and those could become time-consuming. It was a great little project that turned out to be a lot more than expected, but I learn so much!
I'm very happy with the result... expect more of Docker in the future!
Git Commands to Keep a Fork Up to Date (Phil Nash) - Git can be overwhelming at the beginning, this is why this post is a great one to confirm what you may already know and learn a bit more.
.NET Rocks! vNext (Carl and Richard, John Papa) - How could you not try to do some node on Azure after listening to that episode?
Programming
Writing a Blazor App (David Pine) - This tutorial shows how to build a simple blazor app...and it's NOT the hello-word or todo.
Miscellaneous
Introducing Ghost 2.0 (John O'Nolan) - Woo that a big change! If you don't know Ghost already, it worth a try.
Azure Block Blob Storage Backup (Hemant Kathuria) - A very cool tutorial that explains all steps to build a full incremental back-up between azure blob storages (in two different subscription)]
How do you even know this crap? (Scott Hanselman) - An interesting post that successfully connects developers, dungeon & dragon, and poop~?
OBS for Twitch (John Papa) - A quick post about the OBS that everybody is talking about.
The Devtest labs is a fantastic tool to quickly build environments for development & test purposes and for a classroom. It offers great tools to restrict the users without removing all their freedom. It will speed up the boarding, with its claimable VMs that are already created and are waiting for the user. Formulas will help ensure you that you always get the latest version of your artifact installed on those VMs. And finally, the auto-shutdown will keep your money where it should stay...in your pocket.
In this post, I will show you how to deploy an Azure Devtest Lab with an Azure Resource Manager (ARM) template, and create the claimable VMs based on your formulas in one shot.
Step 1 - The ARM template
First, we need an ARM template. You can start from scratch of course, but it may be a lot of work if you are just getting started. You can also pick one from GiHub and customize it.
What I recommended, is to create a simple Azure Devtest Lab directly from the Azure portal. Once your lab is created, go in the Automation script option of the resourcegroup and copy/paste the ARM template in your favorite text editor.
Now you must clean it. If you don't already know it, use the 5 Simple Steps to Get a Clean ARM Template method, it an excellent way to get started.
Once the template is clean we need to add a few things that didn't follow during the export. Usually, in an ARM template, you get one list named resources. However, a Devtest Lab also contains a list named resources but it's probably missing.
See In the following example, I added the labs resources list just after the lab's location. This list must contain a virtualnetworks. It's also a good idea to add a schedules and a notificationChannels. Those two will be used to shut down automatically all the VMs and to send a notification to the user just before.
Now that the Devtest lab is well defined, it's time to add our formulas. If you had created some already from the portal, don't look for them in the template. At the moment, export won't script the formulas.
A quick way to get the JSON of your formulas is to create them from the portal and then use Azure Resources Explorer to get the code.
In a web browser, navigate to https://resources.azure.com, to open your Resource Explorer. Select the subscription, resource group, and lab that you are working on. In the node Formulas (4) you should see your formulas, click one and let's bring that JSON into our ARM template. Copy-paste it at the Resource level (the prime one, not the one inside the Lab).
Step 2.5 - The Azure KeyVault
You shouldn't put any password inside your ARM template, however, having them pre-define inside the formulas is pretty convenient. One solution is to use an Azure KeyVault.
Let's assume the KeyVault already exists, I will explain how to create it later. In your parameter file, add a parameter named adminPassword and let's reference the KeyVault. We also need to specify the secret we want to use. In this case, we will put the password in a secret named vmPassword.
Now to get the password in the ARM template just use a regular parameter, and voila!
Step 3 - The ARM Claimable VMs
Now we have a Lab and the formulas, the only thing missing is the claimable VM based on the formulas. It's impossible to create in one ARM template both formulas and VMs. The alternative is to use a script that will create our VMs just after the deployment.
az group deployment create --name test-1 --resource-group cloud5mins --template-file DevTest.json --parameters DevTest.parameters.json --verbose

az lab vm create --lab-name C5M-DevTestLab -g  cloud5mins --name FrankDevBox --formula SimpleDevBox
As you can see in the second Azure CLI command, we are creating a virtual machine named FrankDevBox based on the formula SimpleDevBox. Note that we don't need to specify any credential because everything was pre-defined in the formula. Pretty neat!
Here a part of a script that will create if it doesn't exist a KeyVault and populate it. Then it will deploy our ARM template and finally, create our claimable VM. You can find all the code on my GitHub project: Azure-Devtest-Lab-efficient-deployment-sample.
[...]

# Checking for a KeyVault
searchKeyVault=$(az keyvault list -g $resourceGroupName --query "[?name=='$keyvaultName'].name" -o tsv )
lenResult=${#searchKeyVault}

if [ ! $lenResult -gt 0 ] ;then
    echo "---> Creating keyvault: " $keyvaultName
    az keyvault create --name $keyvaultName --resource-group $resourceGroupName --location $resourceGroupLocation --enabled-for-template-deployment true
else
    echo "---> The Keyvaul $keyvaultName already exists"
fi


echo "---> Populating KeyVault..."
az keyvault secret set --vault-name $keyvaultName --name 'vmPassword' --value 'cr@zySheep42!'


# Deploy the DevTest Lab

echo "---> Deploying..."
az group deployment create --name $deploymentName --resource-group $resourceGroupName --template-file $templateFilePath --parameters $parameterFilePath --verbose

# Create the VMs using the formula created in the deployment

labName=$(az resource list -g cloud5mins --resource-type "Microsoft.DevTestLab/labs" --query [*].[name] --output tsv)
formulaName=$(az lab formula list -g $resourceGroupName  --lab-name $labName --query [*].[name] --output tsv)

echo "---> Creating VM(s)..."
az lab vm create --lab-name $labName -g  $resourceGroupName --name FrankSDevBox --formula $formulaName
echo "---> done <--- code="">
In a video, please!
I also have a video of this post if you prefer.
Conclusion
Would it be for developing, testing, or training, as soon as you are creating environments in Azure, the DevTest Labs are definitely a must. It's a very powerful tool that not enough people know. Give it a try and let me know what do you do with the Azure DevTest Lab?
Vaporized: Solid Strategies for Success in a Dematerialized World (Robert Tercek) - I really loved that book. In this world of digital transformation where everything goes so fast, this book explains why you should care. In fact, it asked so many good questions and related facts. I like to pretend I'm aware of the new technologies. That I'm on the edge, that I'm aware of the trending stuff... But guess what?! I got surprised, and even a bit scare at one point. This book is a must. Enjoy! ASIN: B01F9G31H8
New recommendations in Azure Advisor (Kaitlyn Corazao) - This post provides a few more reasons to start looking at the advisor (but I'm sure you all already doing it.)
How to setup ASP.NET Core 2.1 on Linux in under 10 minutes (Daniel Crabtree) - Nice tutorial that goes further tthan simply the creation of the hello word application by showing some debugging configuration, and executing alternatives.
AWS Step Function Serverless Applications (Gerald Bauer) - What a great tutorial! Very interesting all the plumbing and toolings is explained in this Hello word AWS Lambda.
PowerApps Newbie – getting started (Jen Kuntz) - Nice first post of a promising series ;) To all the #powerusers of planet earth... you want to use PowerApps... so this is your chance to get started!
LINQ Challenge #3 (Mark Heath) - Okay, I know I'm not a LINQ expert but ... I'm curious to see the answers and will definitely give it a try.
Unit Testing in ASP.NET Core Web API (Milos Davidovic) - Great tutorial that explains every bit of the inversion of control and how to create your unit tests.
7 best practices for building containers (Google) - This post helps us to improve our skill with containers. It also shares a lot of excellent more detailed references.
How to Lead When You’re Feeling Afraid (Peter Bregman) - A really interesting post that will help us, for sure, because we all leave this kind of situation one day or the other.
Defeating Electron (Felix Rieseberg) - Pretty good is the chance that you are (just like me) using an application builds on top of electron. This post explains a little about what's it happening under the hood.
An Introduction to Azure Functions (Matt Soucoup ) - If you are looking to get started on Azure function or looking for the Microsoft serverless offer, this post is definitely a good place to start.
Developing bots for Hangouts Chat (Wesley Chun) - If you are using GSuite and still not leveraging bots... This post is a nice starting point to get inspired.
I have been waiting for this feature for so long! I know; it's not a major feature, but it fills an important gap in the Azure offer. We can now create static websites in the Azure Blob Storage (as I'm writing this post the service is still in preview). In this post, I will explain why I think it's a really good news, show how to create and publish on a static website.
Why It's an Awesome News
The cloud is the perfect place when you need to build something huge very quickly. It's also an excellent solution when you have a lot of variance in the number of resources it required. Because Azure is a service, it will provide you as many resources as you would like in few minutes. And when you are done with the resources you stop paying for them; and it's really great like that!
However, if the only thing you need was to host a little something like a blog or a little website for an event or some temporary publicity Azure was not the best place for it. I mean yes of course, you could build a service and host many little websites on it (Scott Hanselman as excellent posts about that like this one), but it felt always a bit overkill for most of the users. Some people kept an "old style" host provider just for that. I mean it's fine, it works... But with Azure storage, it will be really reliable, and at a lower cost! Let's see how we can create one.
Create a Static Website
To have the static website feature you need to create an Azure Blob Storage account the same way you created them before, however, it needs to be of kind General Purpose V2 (GPV2). Today if you install the Azure CLI Storage-extension Preview, you can use it to create one, or simply go on the portal.azure.com. Let's use the portal since it's more visual.
Once the storage is created, open it. On the left menu of the storage blade, click on the Static website (preview) option. That will open the configuration page for our static website. First, click the Enabled button then enter the initial/ index document name (ex:index.html). Finally, click the Save button on the top of the blade.
The shell for our website is now created. A new Azure Blob Storage container named $web h been created. The Primary and secondary endpoint should now be displayed (ex: https://frankdemo.z13.web.core.windows.net/). If you test this URL, you will see and message saying that the content doesn't exist... and it's normal.
Create some content
This is the part where it all depends on your needs. You may already have some HTML pages ready, or you may want to code them all yourself, or the website may previously exist. For this post, I will create a brand-new blog using a static website generator named Wyam (if you would like to see how to do it with Jekyll, another generator, I used it in the video)
To create a new template with Wyam you use the following command in a command prompt. That will create a new website in the subfolder output.
wyam --recipe Blog --theme CleanBlog
Publish to Azure
It's now time to upload our content to the Azure blob Storage. The easiest is probably directly from the portal. To upload a file, click on the $web container, then the Upload button. From the new form, select the file and upload it.
The main problem with this method is the that it only works one file at the time... And a website usually has many of those...
A more efficient way would be to use Azure Explorer or some script. Azure Explorer doesn't support yet the Azure Storage Static Website, but it will be soon. So that leads us to scripts or command lines.
AzCopy
I really like AZCopy as it's very efficient and easy to use. Unfortunately, as I'm writing this post, AzCopy doesn't support the Azure Storage Static Website. I try to upload all content from the output folder (and sub folders)) with a command like this, but it fails.
An Azure CLI extension preview is also available. Like I mentioned previously, the extension gives you the possibility to create a static website or update the configuration, to upload files you have two options the batch would be more efficient of course, but the file by file option also works. Thanks to Carl-Hugo (@CarlHugoM) for your help with those commands.
I finally tried the Visual Studio Code Stogare Extension. After installing it, you need to add a User Setting Ctrl + ,. Then add "azureStorage.preview.staticWebsites" : true to your configuration. Now you just need to click on the extension, then select Azure blob storage from your subscription, and right click to be able to upload a folder.
Depending on how many files, and their sizes it will take a moment. VSCode will notify you when it's done. You will then be able to get back online and refresh your website to see the result.
Conclusion
I'm very happy to see that feature because it fills a need that was not really cover yet by the Microsoft offer. Right now, it's an early preview so even if the service is very stable, not all the tools support it but that only temporary. Right not you can set your custom domain name, however, HTTPS is not supported.
So what do we do with it? Should we wait or jump right on? Well as the best practices imply when a feature is in preview don't put your core business on it yet. If you are just looking to build a personal website, a little promo than... enjoy!
Power BI and Sudoku – Yes Please (Mike Carlo) - Awesome! I really like when people think outside of the box. This post gives you link to the game and to a more detailed post.
How to use Visual Studio Code (Flavio Copes) - Another post that confirms that VSCode definitely worth our attention. This post gives examples, and shows deferent extensions... If you don't know vscode... Yep start here.
[Invisible Ink: A Practical Guide to Building Stories That Resonate] (Brian McDonald) - We all know it, a story is the element that will give that little plus to our post, and video. This short book explains how to really make an effective one talking about the not visual things... Really interesting.
Azure functions are great. I used to do a lot of "csx" version (C# scripted version) but more recently I switched to the compile version, and I definitely loved it! However, I was looking for a way to keep my deployment short and sweet, because sometimes I don't have time to setup a "big" CI/CD or simply because sometimes I'm not the one doing the deployment... In those cases, I need a simple script that will deploy everything! In this post, I will share with you how you can deploy everything with one easy script.
The Context
In this demo, I will deploy a simple C# (full .Net framework) Azure functions. I will create the Azure Function App and storage using an Azure Resource Manager (ARM template) and deploy with a method named Zip push or ZipDeploy. All the code, script, a template is available on my Github.
The Azure Functions Code
The Azure Function doesn't have to be special, and it can be any language supported by Azure Functions. Simply to show you everything, here the code of my function.
namespace AzFunctionZipDeploy
{
    public static class Function1
    {
        [FunctionName("GetTopRunner")]
        public static async Task Run([HttpTrigger(AuthorizationLevel.Function, "get", "post", Route = null)]HttpRequestMessage req, TraceWriter log)
        {
            log.Info("C# HTTP trigger function processed a request.");

            string top = req.GetQueryNameValuePairs()
                .FirstOrDefault(q => string.Compare(q.Key, "top", true) == 0)
                .Value;

            if (top == null)
            {
                dynamic data = await req.Content.ReadAsAsync< object>();
                top = data?.top;
            }

        return top == null
                ? req.CreateResponse(HttpStatusCode.BadRequest, "Please pass a number to get your top x runner on the query string or in the request body")
                : req.CreateResponse(HttpStatusCode.OK, new { message = $"Hello, here is your Top {top} runners", runners = A.ListOf(int.Parse(top)) });
        }
    }

    class Person
    {
        public string FirstName { get; set; }
        public string LastName { get; set; }
        public int Age { get; set; }
    }
}
It's a really simple function that will return a list of Person generated on the fly. The list will contain as many person as the number passed in parameter. I'm using the very useful GenFu library, from my buddies: ASP.NET Monsters.
The only thing we need to do is to create our compress file (Zip or Rar) that contains everything our project required.
In this case, it's the project file (AzFunction-ZipDeploy.csproj), the function's code (Function1.cs) the host (host.json) and local settings of our function (local.settings.json).
The ARM template
For this demo, we need one Azure Function App. I will use a template that is part of the Azure Quickstart Templates. A quick look to the azuredeploy.parameters.json file and we see that the only parameter we really need to set is the name of our application.
To be able to ZipDeploy, we need to add one Application Setting to let the Kudu interface we need its help to compile our code. To do that let's open the azuredeploy.json and go to the appSettings section. We need to add a new variable named: SCM_DO_BUILD_DURING_DEPLOYMENT and set it to true. After adding the setting it should look like this (see the last one... that's our new one):
Now that all the pieces are ready it's time to put it together one script. In fact, only the two last commands are required; everything else is just stuff to make it easier to re-use it. Check out my previous post 5 Simple Steps to Get a Clean ARM Template, to learn more about the best practices related to ARM template. So let's see that script, it's pretty simple.
    # script to Create an Azure Gramophone-PoC Solution

    resourceGroupName=$1
    resourceGroupLocation=$2

    templateFilePath="./arm/azuredeploy.json"
    parameterFilePath="./arm/azuredeploy.parameters.json"

    dateToken=`date '+%Y%m%d%H%M'`
    deploymentName="FrankDemo"$dateToken

    # az login

    # You can select a specific subscription if you do not want to use the default
    # az account set -s SUBSCRIPTION_ID

    if !( $(az group exists -g  $resourceGroupName) ) then
        echo "---> Creating the Resourcegroup: " $resourceGroupName
        az group create -g $resourceGroupName -l $resourceGroupLocation
    else
        echo "---> Resourcegroup:" $resourceGroupName "already exists."
    fi

    az group deployment create --name $deploymentName --resource-group $resourceGroupName --template-file $templateFilePath --parameters $parameterFilePath --verbose

    echo "---> Deploying Function Code"
    az functionapp deployment source config-zip -g $resourceGroupName -n zipdeploydemo --src "./zip/AzFunction-ZipDeploy.zip"

    echo "---> done <--- code="">
The only "new" thing is the last command functionapp deployment source config-zip. That where we specify to the Azure Function App to look to --src to get our source. Because I'm running it locally, the path is pointing to a local folder. However, you could execute this command also in the CloudShell, and that would become a URI... to an Azure Blob Storage by example.
Deploy and Test
If you didn't notice yet, I did my script in bash and Azure CLI. That because I want my script to be compatible with all platforms. Of course, you could have done it in PowerShell or anything else that would call the REST API.
To deploy, just execute the script passing the ResourceGroup name, and its location.
./Deploy-AZ-Gramophone.sh cloud5mins eastus
To get to Function URL, go to the Azure portal (portal.azure.com) and click on the Function App that we just deploy. Click on the function GetTopRunner in this case, and click on the </> Getfunction URL button.
Use that URL in postman and pass another parameter top to see we the deployment ws successful.
In Video Please
If you prefer, I also have a video version of this post.
New Updates for Azure Development in Visual Studio (Visual Studio Team) - Great update to the tooling that makes our life easier... Or at least that reduce (a lot) the pain when starting and deploying a project.
How I choose which services to use in Azure (Barry Luijbregts, Scott Hanselman) - Oh wow! Very interesting video, presenting a nice and structured way to pick our cloud services.
10 Reasons to Use Durable Functions (Mark Heath) - To celebrate his new course about durable function, Mark shares with us his top10 of the best reason with should use durable functions.
Creating PDF on ASP.NET Core (Gunnar Peipman) - Am bookmarking this one. Creating PDF is a common task and that code look "simple".
Data
Power BI Desktop May Feature Summary (Amanda Cofsky) - The monthly updates is always a great new. This month shows more about that new Q&A feature... You may not know about it, but you really want to use it...
Data Encodings and Layout (Clemens Vasters) - Very useful and deep article that provides the best practices for data encoding for different type of situation.
Books
Exactly What to Say, The Magic Words for Influence and Impact
(Phil M. Jones)
I listen to this audio book and really enjoy it. Simple powerful key works selection tat helps us to get where we want to go. It was only about two hours long and I listen to it in one shoot. And I’m mostly certain I will listen to it again.
ISBN 9780692881958


 .
.


 Cloud
Cloud


 Cloud
Cloud Vaporized: Solid Strategies for Success in a Dematerialized World


 Suggestion of the week


 Cloud
Cloud
 We all know it, a story is the element that will give that little plus to our post, and video. This short book explains how to really make an effective one talking about the not visual things...


 Cloud
Cloud Exactly What to Say, The Magic Words for Influence and Impact